Tuesday, 29 December 2020

Orange Gourd Birdhouses

I finally played with some gourds to make a birthday present for someone whose favourite colour is orange!

I started off cleaning three just in case something went wrong as they seem rather thin and delicate now that they're all dried out. First one got kicked from the cleaning process as I found a big crack. The one on the left also has a crack in the bottom so I used it as my practice before making the one on the right for the gift. The reason for finishing off the one on the left was that I figured it would be good to stick it in the garden as an experiment to see how long they last outside.

Not a bad project when I feel like doing something different, but scrubbing (or rather scraping) them clean does take quite awhile - even after soaking them first. I used spray paint with primer that was suitable for wood and the wire is just galvanised wire from the fencing section at Bunnings. I doubt any wild birds will move into it once I put it in the garden but I added drainage holes to the bottom just in case.

Tuesday, 22 December 2020

Merry Christmas

Since we have a busy few days coming up and will be travelling on Christmas Day I thought it best to wish all my readers a very Merry Christmas a little early. It is going to be a very different Christmas this year for many people all over the world, so I hope everyone can get some enjoyment this year even if traditions and large family gatherings have to be missed this year due to covid.

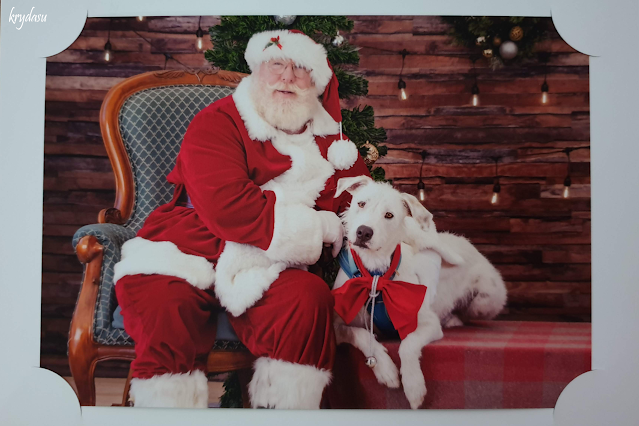
Luckily since Archie is a dog he was able to get his first cuddle with Santa this year unlike many children. He was incredibly excited but surprisingly calmed down long enough for this cute photo!

Tuesday, 15 December 2020

Jar Labels

Every year I make sweet chilli sauce to give out as gifts. It started because I used to have a slight obsession with growing different chilli varieties even though we don't eat them! Plus now I have a sweet chilli sauce that I actually like and I can make it seedless, plus everyone I've gifted it to seems to like it.

If you're interested in making it yourself, I use this recipe but I use white vinegar instead of apple cider vinegar and halve the ginger. Since we don't like our food to burn our mouths I use approximately 2/3 medium heat chillis and the rest is a sweet, mild chilli. Of course this changes depending on what chillis I have grown each year. I make a double batch so I have enough for gifts and our own consumption for the year - although if I run out again I'll have to triple it next year!

Originally I started out just using a sharpie to label the jars each year but then I started using my silhouette to make stickers. They look so much nicer that I did the same for the little gift jars of honey as well. Although after weeding all of those stickers I'm thinking next year I'll just do printable labels to make my life easier!


Tuesday, 8 December 2020

Calico Shopping Bags

Every now and then I see reusable bags for sale at the shops that have a plain print on them which is perfect to colour in with Sharpies! I've collected 3 of them to colour in now and have finally finished the first one I bought. I've even done a quick hand wash and the colour stuck! You do have to be careful as sometimes the colour bleeds, it's only really noticeable when using light colours next to dark ones.

Tuesday, 1 December 2020

Big Brother Bandana

I made a bandana for our dog to announce to our parents that we're having a baby! We're due in April so I really need to start making things for our baby, so far I've got some tie dye onesies ready, but I want to start sewing some gender neutral outfits since we don't know if it's a boy or girl.

It was pretty simple, I sewed up a bandana just by copying one of the bandanas we already have for Archie since they fit him well. Then I printed up what I wanted written on the bandana, taped the bandana to the piece of paper, then taped all of it to the window on a sunny day and simply traced it with a permanent marker. 

I used a thin cotton pillowcase (that Archie chewed a hole in!) as it was easy to see the writing through the fabric. Originally I tried making one using an old tshirt so I didn't have to sew anything, but it was difficult to see through. I'd recommend using the woven cotton as the stretch of the tshirt fabric caused the marker to drag and it didn't look very nice. 

Tuesday, 24 November 2020

First Honey Harvests

Awhile ago we harvested two frames of honey from the brood box before we put our super on using the crush and strain method. I made a huge mess but we got just over two litres of honey and a nice chunk of beeswax as well! It was my first time harvesting honey and rendering beeswax and I had fun, but I'm sure it would get monotonous after awhile.

Last week I got to harvest from the 2 of the flow frames for the first time. We ended up with 1.9 litres from the first frame and 2 litres from the last frame. So much easier, far less mess and no wax to render when you have flow frames!

I also made up some little jars of honey to give away at Christmas and they look so cute!


Tuesday, 17 November 2020

Another Crochet Blanket

I've been unwell lately so I decided I would finally do my youngest nephews crochet blanket. I did blankets for 3 of my other nieces/nephews in the multicolour yarn so picked this nice green and blue mix. It's amazing how fast this one was finished since I spent a lot of time watching netflix! His birthday isn't until September so I'm feeling super organised!

Tuesday, 10 November 2020

Pyrography Nativo Bee Hive

I did some wood burning on another native bee hive, this one is a Nativo hive. I still need to revarnish it as I sanded it all off before I started burning, it's possible to burn while varnished but I prefer not to. Once I've varnished it I'm going to use it as an eduction on my TC hive, this will be the first time I try them so we'll see how they go!

Tuesday, 3 November 2020

Venus Fly Trap Flower

I bought another venus fly trap last year and surprisingly I've kept it alive! I have tried and failed so many times, I'd love to repot it into something nicer but I'm not brave enough yet. I was so excited when I first noticed the flower spike and it feels like I've been waiting forever to see the flower open!

And as usual I didn't notice the tiny little bug until I was looking at the photos of my computer, it still has a few buds to open so I'll be able to enjoy these cute little flowers for awhile.

Tuesday, 27 October 2020

Tie Dye!

This year for Christmas gifts I'm doing tie dye tshirts and I've started already so I can do some shirts for us as well! 

Since I prefer just one colour for my tie dye I don't do it the correct way, I use normal clothes dye where you soak the fabric in a bucket. I always have spare onesies on hand as there is always room in the bucket for some tiny baby clothes - plus they make great gifts for baby showers.

Tuesday, 20 October 2020

Bamboo Salad Hands

These were a birthday gift last year and I wish I had bought more of them because they turned out great! Unfortunately when I went back to buy more they had none left.

Bamboo is a little difficult to burn, especially thick lines so this simple monstera leaf worked out well.

Tuesday, 13 October 2020

Pillowcase dress

 I'm trying to be organised this year so I've started planning all the kids Christmas presents, and I want to get all of this years birthday presents finished!

So here is a December birthday present finished and ready to wrap for a 2nd birthday present.

I used this tutorial if you wanted to try sewing one yourself. The binding is a little tricky, but I just sewed really slow and I'm happy with how it turned out. I opted to make size 3, as I figured it's better to be too big rather than too small.

Tuesday, 6 October 2020

Chevron Crochet Blanket

Well I finally finished the first crochet blanket I started! This one I wanted as a throw for the couch but since it was a pattern for a baby blanket it is a bit small. Maybe it can just sit on the couch for looks rather than warmth.

Since I watch tv while I crochet there were a few times where I noticed that I'd done an extra row that I had to undo. And since I have around one ball of each colour left I decided to start a 'leftover' blanket where I do blocks of colour using up the last of each leftover ball. And I doubled the width so hopefully one day we'll have a blanket big enough for two adults! Since I only have three leftover balls I figure I can just buy a ball whenever I need it until the blanket is big enough.

Tuesday, 29 September 2020

Flow frames are being filled

 At the start of the month we added the super to our Flow Hive and were expecting the bees to take awhile to get used to the flow frames. Surprisingly when I checked a couple of days later they had started filling the gaps with wax. I did another peek through the windows today and they have started filling the flow frames with honey!


Sorry about the glare on the perspex, I hope you can see the honey filling all the pots, it is rather exciting. Once they have capped the cells it means the honey is ready to be extracted, then they can clean it out, seal up the cracks and start again! Next time it will be ready alot faster as they can reuse the wax that is already there.


Tuesday, 22 September 2020

Colour In Cushion

I had forgotten about this fabric I bought from Ikea many years ago and decided to turn it into cushions for all the kids birthdays this year. Since I just finished the last one I thought I'd better get a photo before I wrapped it. So far the two kids who have received their cushions have loved them!


And now that it is done, I think I need one for myself as well. We just bought a daybed for our lounge room so I'm in need of lots of comfy, new cushions, for now we just have a whole lot of pillows with pillowcases on them. One by one those pillows will get turned into cushions - if you can't find a cushion insert just grab a pillow by the short end, one hand on each corner and flick it so all the stuffing compacts at the other end. A standard cheap polyester filled pillow will compact enough to fit into a cushion cover.

Tuesday, 15 September 2020

Extra handles on a dog lead

Archie is a bit of a handful and I experimented with short and long leads but found we needed both at different times on our walks. Sure we could just grab the lead down low, but as he got bigger and stronger it got more difficult to hold him close.

So I bought a longer lead and sewed two extra handles to make it easier to hold him close. Something so simple to do makes it so much easier to control our huge puppy on walks! 


I just used my normal sewing machine and a 14 needle and sewed back and forth a few times, he'll be turning one on Thursday and his old one is still holding up - he'll chew through the webbing before my stitches come apart! I sewed up a new one for his first obedience class last night, boy was he naughty!

Tuesday, 8 September 2020

We added the super to our Flow Hive!

So back in July I shared a photo of our beautiful Flow Hive with the bee nucleus we got in April.

Our bees have been busy all winter and I noticed they were starting to beard on the front of the hive. Being that we have only just hit spring, it wasn't because of the heat so I opened them up to find they had started building comb between the frames and the lid as they had run out of room for honey!

I saved the honey from the clean up of the lid and it is delicious! We have heard that the bees can take a while to start using the flow frames for the first time. With their hive being so full we pulled out a frame of honey and gave them an empty frame they can start on until they're ready to use the flow frames.

Now they have plenty of room and they are as busy as always! It's not the best photo sorry, I had bees bouncing off me while I was standing in the flight path. It was overcast and windy, it still surprises me how busy European bees are in bad weather. Our natives bees are much smaller and don't leave their hive on days like this!

We chose the flow hive so we didn't need honey extraction equipment.As we mainly want honey, the flow hive made the most sense for us, especially since we can only have one hive. Which means, for the frame we removed we will be doing the mash and strain technique. We will use this technique whenever I need some wax for my homemade hand balm.

I'll let you know how we go with our first mash and strain experience, and hopefully soon we can share our first flow harvest with you!

Tuesday, 1 September 2020

Chicken Coop Signs

Before we got chickens I spent ages researching chicken coops and saw so many funny chicken signs that I decided to make a few for my own chicken pen. The first one I ever made was "Eggcellent House" which my mum wanted as the name for her chicken coop. She never got around to hanging it on her coop so when she rehomed her chickens she gave it back to me.

The top two are just pieces of dressed pine which I varnished really well, they're in need of a light sand and recoat as the varnish is starting to crack on the top, but the burn has been protected by the varnish.

The mother cluckers was oiled decking timber and unfortunately being in full sun it has faded the burn and the wood has gone mouldy in the rain. I have a new sign on decking timber that I need to varnish so I can see how that well that lasts in our wonderful Aussie sun!

Tuesday, 25 August 2020

Orchids

I have a little collection of orchids, well not so little I suppose since I have told myself not to buy anymore! You would think since I have so many that I knew how to look after them, but a lot of it is simply luck - as in it is lucky that they like to be left alone! After researching why they weren't flowering I did find out they prefer a bit of sun during winter - and they don't need as much shade as I thought. So after I moved them into the bee garden I have been finding surprise flowers more often, in fact I just found three orchids with new flower spikes!


I really need to remember to take nice photos of the orchids when they're flowering. Most of my orchid photos are of me holding the id tag in front of each orchid in case the tag fades or gets lost, or they're just really bad photos!

Tuesday, 18 August 2020

Cards from Colouring Books

Does anyone else have a stack of adult colouring books that you haven't touched for awhile? As a kid I loved colouring in, but as an adult I find it a waste to colour in without a purpose for the finished pages. So since I love stamping and colouring in cards I figured why not colour in my books and stick them on blank cards.


I coloured these in using alcohol ink pens - they don't show up the darker sections where the ink overlaps like sharpies and markers do. For the bigger ones I cut to size first then used double sided tape. The smaller tags are blank business cards. I covered the card with a glue stick, pressed onto the paper and once dry I trimmed it with scissors to match the card.

Tuesday, 11 August 2020

Kitchen Window Herb Drying

I like to grow calendula flowers which I use to make calendula infused oil for my hand balm - I use the instructions from grow forage cook ferment.

For infused oils they need to be dried first, I do have a dehydrator which is great if I have enough to fill it. So when my plants are just starting to flower I bring them inside and hang them up either until dry or there are enough to fill the dehydrator.

I was originally using one of those portable peg hangers that you can dry all your socks on. Not very attractive, or all that easy to hang in my kitchen!

So I opted for a tension rod across my kitchen window, shower curtain rings and curtain hooks from Ikea.


It is out of the way, looks so much better and if I ever need more room I can add hooks, or even a second tension rod. It also now uses what was technically wasted space and we can still open the window and blind without moving the rod.

Most herbs and flowers hang well from the clips. For collecting seed to dry out I use paper bags. The red mesh onion bag is currently holding sugar snap peas, purple snow peas and beans for seed saving.

Tuesday, 4 August 2020

Desktop Drawers

I always love those cute little decorative drawers that you can buy to clear up all the clutter on your desk. For some reason though I had never bought myself a set, I just have those ugly clear plastic ones that don't actually hide my junk.

Until I saw these and decided it was time for an upgrade that doubles as a craft project.


It was so easy, spread pva glue on scrapbook paper, stick it on the drawer front, smooth out the bubbles then once dry trim the edges with a craft knife. The silver one was actually glitter contact which was the same process since it didn't want to stick to the mdf. So quick to do and it looks so much nicer.

Tuesday, 28 July 2020

Superworms

I know, lots of people think superworms are gross (my husband included!) but my chickens and quails love them! I used to breed the mealworms for them because they're easier to get to pupate than the superworms but then I got lucky and my container of superworms decided to start the process all on their own! 

The main reason I go through phases of breeding them is when they get a grain mite infestation in their bran - it is impossible to get rid of and grosses me out. I tried freezing and microwaving the bran before the eggs hatch, but it seems inevitable that they survive and take over. I've researched these guys a lot trying to find a different bedding solution but all I kept finding was bran or oats, so I started experimenting.

First up I tried no bedding but it ends up with a lot of moisture on the bottom and the worms started dying off. Then I tried sand but it also ended up holding a lot of moisture on the bottom of the container. I had tried them on fresh mulberry leaves, which they liked so I dehydrated and crushed so many leaves which worked well, but was a lot of work! 

Now occasionally when I garden where I used to compost all the quail bedding I kept finding what looked like elongated mealworms so I thought what about plain dirt? Obviously I didn't want to bring garden dirt in to hatch who knows what to contaminate my worm colonies (or my house!) - so what about those coir blocks that you add water to and they expand?


Yep it works great - they eat it just like they do with the bran and it doesn't hold a lot of moisture in the bottom as the worms help move it around, which in turn helps it dry out faster. And I've found it doesn't get as smelly as the bran either, I tried with a lid and without a lid - without a lid they stay even drier of course, but even with a lid I don't have moisture issues.

It wouldn't be as easy to sift out mealworms as the coir isn't as consistently fine as bran, but it's great for the superworms.

Tuesday, 21 July 2020

Puppy proofing the garden

I guess I shouldn't just call it puppy proofing when fencing off the gardens started because of the chickens. Luckily a short fence that I can easily step over and move works to keep both Archie and the chickens out!

And even better, flimsy, wobbly fences seem to work best! If it's nice and solid under his paws, Archie will happily jump and lean on it, but if it flexes or moves he won't touch it in case it falls and makes a scary noise (yep typical big dog, big sook)! For the chickens if it looks like it has a nice sturdy top they will happily land on it and jump in the garden. Like this fence we put around the mango tree - they liked to sit up there and watch the world go by!


These chicken wire and fence paling fence panels were my original chicken fences to keep them off the concrete and out of my pot plants. They have seen better days, and I'm surprised how well they've held up to Archie. A couple of panels have a new use as a rather rustic plant trellis for my snow peas. In front of those are puppy play pen panels which work great to keep the chickens out - and Archie. It's nice as they are cheap, easy to install and easy to see the garden (and mess) they're protecting. I do use garden stakes and zip ties for a little extra support.


Similar to the puppy pen panels I have an assortment of old panels off rat cages and compost cage panels which also work well with garden stakes and zip ties. They normally get used to cover Archie's excavation attempts so the grass gets a chance to grow back!

Since I can't trust Archie with the chickens I did want something a bit stronger between them. So I made some simple fence panels using only fence palings. I then either use screws or zip ties to attach to garden stakes, the chicken cage or the verandah posts. They look so much nicer, unfortunately they do block a lot of the view into my gardens - I think I'll save this type of fence for hiding messy areas! They are nice though as I can make sturdy gates for them with proper latches.


Once I've settled on a layout for our backyard we will do a permanent fence for the gardens, until then I'll stick with my current mix of panels. Who knows, by that time Archie might be too lazy to destroy my gardens and I won't need the fences anymore...

Tuesday, 14 July 2020

Birdhouse Gourds

Last year I finally planted two birdhouse gourd seeds to grow over the chicken coop - along with loofahs and snake beans. They did grow over the chicken coop, but they also travelled up our huge dracena, over the quail shed and along the shade cloth we hang over the bees.

With all the research I did, I was only expecting a few gourds from each plant. But only one plant survived to do all that travelling, and I now have so many gourds! Surprisingly the plant is only dying now wheras the loofah died off when the cold hit over a month ago.


Gourds can take months to dry, as they've dropped from the vine I starting making macrame hangers from twine so they have really good air circulation to prevent rotting. Then I just grabbed an old piece of wood from the yard, screwed in a whole heap of cup hooks and put it between the sheds. I read that they go mouldy and smell pretty bad as they dry out so I figure the junk pile won't mind!


It's working well, I have a few that seem to be fully dry and I haven't noticed any mould or any bad smells - not that I'm going to breath deeply or intentionally smell them when I get close.

Since that old piece of wood doesn't seem to be coping too well with the weight of the fresh gourds the rest will hang out on the mulch until I have room on the hanger. Gourd farmers do just leave them in the field over winter until they dry out so this shouldn't be a problem. Although I do wonder if contact with the ground might cause mould or rot issues.

The first thing I'm going to do is put a couple of small ones in with my finches to see if they like them. The main reason I wanted to grow them is to do pyrography on them. I've seen them used for bowls, spoons, yarn bowls, ornaments, planters, lanterns and of course they used to be used for water hence their other name of bottle gourd.

Tuesday, 7 July 2020

Honey Bees

For my birthday last year we ordered a Flow Hive so we could finally get our very own honey bees! We could of course get honey off our native bees but it is a lot of work for little reward and I prefer the taste of the European bee honey.

Our long awaited hive arrived right when life threw us lots of lemons. So as is my way of coping with grief, I stop creating. I had plans of a beautiful wood burnt hive but instead it sat in its box unassembled because it's so much easier to do the pyrography before assembly.

I tried making myself get it done so we could get bees sooner but I just could not focus on doing the design. And when that was finally done I just didn't feel like even starting to burn.

Gardening became my distraction except it was way too hot in summer so I retreated to the air con and slowly worked on the hive in the middle of the day. And it was finally burnt, assembled and oiled. We bought bee suits and all the gear we needed. I fenced off a spot to keep the chickens and Archie away from the bees. Then covid restrictions started happening and we weren't sure when we could get bees. Thankfully we were able to buy a nucleus and we have now been the proud owners of European bees for 3 months!


We won't be able to add the honey super until Spring, but in the meantime we get to observe, learn and get to know our bees until we can do our first harvest.

Tuesday, 30 June 2020

Rosella Hibiscus

I've grown rosellas before simply because they are a lovely looking plant, but last year I decided to grow enough so I could make some jam.

Last month it was finally time to pick them and try making jam for the first time and it turned out great! It tastes good, set well and so far everyone who has tried has liked it. I used this recipe but skipped the butter and just scooped the bubbly scum off the top. I bought the seeds from there as well.

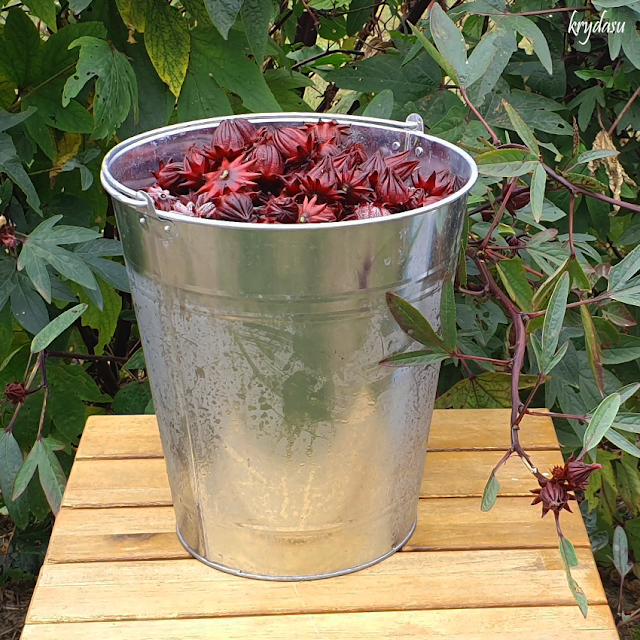
Now my only problem is that I have a bucket of rosellas in my freezer waiting for me to separate them to make more jam.


Rosellas can also be used to make syrup or tea so I dehydrated some for mum, I keep opening the jar because they smell amazing!

As for these bushes, they don't seem to be stopping production so this bucket is likely to be filled again as soon as it is empty. I planted three seedlings so maybe just one will been enough next time...

Tuesday, 23 June 2020

Pyrography Native Bee Hives

Last year, before life threw us many lemons, I got the chance to do a collaboration with Steve from nativebeehives.com who makes beautiful cypress native bee hives. H trusted me enough to decorate some of them with pyrography, along with one of his ukuleles.

I have wanted one of Steve's hexagon hives since we first learnt about native stingless bees. Now I think it is too lovely to put outside in the weather and it sits proudly on display, safely inside. One day I'll find the perfect spot to keep it protected from the elements and where I can see it through the window.

Steve gave me an octagon hive and in exchange I got to burn on two of his other hives for him and he also let me do a burn on one of the ukuleles he makes. These are by far the nicest woodworking pieces I've ever burnt on, I was so excited and but also a little terrified that I might make a mistake on such beautifully made hives. Luckily I didn't mess them up, and I'm really happy with how they turned out.


The only thing that needs to be condsidered when doing pyrography on native beehives is if you want to split them later on - the top two levels will be separated from the bottom level so the design can't continue through the levels.

Steve makes a lot of creative and fun native bee hives that are incredibly high quality so please check out his website - he also has an online store if you're interested in buying your own hive. And if you'd like to read the article he wrote about my pyrography you can check that out here.

Tuesday, 16 June 2020

Terrarium

My sister in law made beautiful terrariums as Christmas gifts one year and I tried so hard (and then replanted it twice) but I just could not keep it alive. So I filled the jar with a layer of white gravel then a nice thick layer of black gravel. Then went to Ikea and bought cute little plastic succulents in pots. I broke them out of the pots and poked them down in the gravel, added the ornaments from the original terrarium plus some cute mini ones.


It looks alright, I much preferred the beautiful fittonia and fern - I just could not get them to survive, so fake succulents will have to do. It would be great if I could keep indoor plants alive - I'm working on it, my fish tank is turning into a plant stand and so far I've got a few survivors!

Tuesday, 9 June 2020

Air Conditioner Screen

We got a big air conditioner for the living area a couple of years ago and I've been wanting to make a cover for it as it is just so ugly! The thing that kicked me into gear was that I got sick of seeing the cage I put around all the pipes to stop the puppies chewing them, that and all their toys getting stuck underneath it.

Now I could have easily bought one, but where is the fun in that? I used hardwood garden stakes for the frame and fence palings to cover the sides, and smaller stakes to cover the top. I also made it bigger than I needed as it is a great place to put pot plants and trays of cuttings, safely out of reach of a certain puppy!


The other bonus of the air con screen is that it is just sitting there without needing to be attached to the house as there is a piece of garden stake sitting down behind the air con so it can't tip forward - this piece also had to sit between the air con unit and the pipes attached to the house wall.

Since I'm terrible at taking progress shots (and before shots) here is the model I made in SketchUp so you can see how simple it is. Oh and please ignore those beautiful mitered corners, as you can see when it came to all that wood cutting I took the lazy route!


Tuesday, 2 June 2020

Etched Tree Glasses

For Christmas 2015 I decided that I'd etch sets of glasses for everyone. I chose trees as my theme so everyone got a different tree for their set just to make them all slightly different.

This year I forced my poor husband to help since these were the gifts for his side of the family and after all, they're from him too! He got the job of washing off the cream and removing the stencils, it was great as it went so much faster :)


They all look pretty similar so I won't bore you with photos of each set. And as you can see, I still haven't had much luck photographing the glasses, maybe one day I'll figure it out!

Tuesday, 26 May 2020

Native Bees

I found out about native bees many years ago and have been a little obsessed with them. We have planted lots more flowering plants and I have planted a small vegetable garden with flowers in between each crop.

Two years ago I started making a dedicated bee garden and we bought our first stingless bee hive from a local man who really knows his stuff! His hives are so well made and they look lovely in our garden.


Tetragonula Hockingsi
Then a few months later we bought our second hive in a huge log, to go in our completed bee garden - next to the chicken coop. (I love my crazy paving using random bricks and pavers)


Left to Right - Tetragonula Hockingsi, Austroplebeia
Then last year I extended the bee garden across where the chickens were so I could make room for yet another hive!


Left to Right - Tetragonula Hockingsi, Tetragonula Carbonaria, Austroplebeia
And then, once the hives are full I can add an empty hive to the front and hopefully end up with a new hive. This is called an eduction, the other way is to split the hive.


The bee garden has also become my orchid garden as they both enjoy shady summers and more sun in winter. I have shade cloth over this area that I remove once the weather cools down.

Tuesday, 19 May 2020

Pillowcases

I made pillowcases for our nieces, nephews and little siblings for their birthdays last year. It was actually the first time I was so organised since I made them all at the same time! I read a few tutorials but found it easier to just grab one of my pillowcases to copy. Obviously buying a pillowcase works out cheaper, but these are all fabrics I chose for each child based on what I thought they would like. Lucky for online shopping as I couldn't find the ninja turtles or pokemon fabric in a store near me. It was worth the wait as those two were so happy when they opened their presents!


Tuesday, 12 May 2020

King Quail

So I absolutely adored raising my chicks and wish we could have a rooster where we live so I could raise them over and over! Since caring for and breeding quails are similar to chickens, and they aren't classed as poultry, I decided to breed them instead. 


I experimented with incubating them and allowing their parents to incubate naturally. I sold lots of pairs but most people want females so I ended up with a lot of males and no more space since each clutch of males needed their own cage. I ended up selling my breeding pairs and now have around 15 males running together in the bottom of  "the quail shed". I have to say it is so much easier to have them on the concrete floor rather than having to clean a million cages, and they don't fight as bad now that they can get away from each other and have more room to run around and burn off that excess energy.

Let's face it, quails don't use all that space in the top of the cage so why not add finches! Most of them were given to me as they were special needs or disabled. Once I put all the quails on the floor of "the quail shed" I moved all the finches into one big cage, but still in the shed as it is mouse proof.

I had loads of fun raising them, but king (button) quails are not as friendly as chickens, they will snatch mealworms from my fingers, but they don't want to be petted, picked up or cuddled. The boys are between 2 and 3 years old so I don't have plans for more quail breeding for a long time!

Tuesday, 5 May 2020

Stamped gift tags

Isn't it great that there are so many beautiful colouring books for adults now? I have always preferred to colour in rather than create the actual drawing. Seeing them everywhere made me decide it was a great time to pull out my stamps and restock my supply of gift tags.

This time I chose to use my watercolour pencils for colouring in, once it is fully dry I use a gel ink pen to redo the outline


Because I used recycled cards I dipped the pencils directly into the water so the colour would show up better. You can blend with a wet paintbrush but I still tend to use a wet pencil for blending.

Tuesday, 28 April 2020

Mother's Day Kokedama

I had a tough time deciding what to make for mother's day presents, I'm finding it harder to not just make the same thing year after year. Lukily I saw a DIY video for making kokedama gifts for mother's day.

It was actually quite a fun little project, a little awkward, but worth it in the end. I did a practice run at home with a spider plant and cotton twine before I decided to go out and buy all the materials. It is still going strong, which is surprising since I don't give it a soak every week like I'm supposed to (and when I do, I tend to forget to take it out until the next day).


I chose to use the lovely zygo cactus, which flowered not long after mother's day. Being a cactus they seem to do well as a kokedama.