Showing posts with label animals. Show all posts

Thursday, 25 April 2024

Chicks and keets

 We've got baby birds! With the chicken themed party for Lily, I decided it would be perfect to get her some chicks... and then I got some guinea fowl keets instead.

Originally I was looking at silkie or belgian d'uccle chicks, but we've had quite a few eastern brown snakes around the house, so we picked up the keets in the hopes they'll help deter snakes when they're older. 

Turns out Lily doesn't really like them as they are very flighty even though they were hatched in an incubator. So a week later we got some silkies, because they're supposed to make great pets for kids...

And they're almost as crazy as the guineas since they were raised by their mums for the first week. 

They're about 2 months old now (I should get updated photos) and altogether in a chicken tractor next to the house, although I think the silkies have had enough of the guineas who run and fly around all day. Luckily we're building their big coop so the guineas will move into that once it's finished, and get them used to the older girls who they'll be living with eventually.

The plan is to build garden beds for the tractor to sit on, that way the silkies can fill them up using the deep litter method, and clean up any garden beds that need a refresh in the future. These little fluff balls will have an important job as well as being pets. Now we just have to wait and find out the gender ratio to decide who we're keeping - it currently looks like I've got three boys and three girls with no favourites to tip the scale.

Thursday, 18 January 2024

Planting chicken shade

 The chickens have a lovely spot under the gum trees, but unfortunately now that summer is here they don't get enough shade in the afternoon. I have hung shade cloth and covered their coop with a tarp, but it's not good enough. My next idea was using sticks and fresh murraya branches to create a lean to against their coop - and they're really enjoying that spot, especially when I put blocks of ice in there on really hot days.

My first attempt at planting in the chicken yard was this elderberry, but between the gum tree with a possum climbing it every night and the mice making tunnels underneath, it struggled along and eventually gave up. 

My second attempt is further away from the gum tree where I've started rosella seeds in one of these garden rings. Once they reach the mesh I plan to add a cage around it until it's a decent size, then replace the ring and cage with logs or rocks. 

At our old house I planted rosellas in a spot that had really dry sandy soil and they did great. Hopefully they'll grow just as quick here to give the chickens a cool, shady spot. I'm also planting them out the front of our house for some quick privacy. And if all goes well, there'll be lots of rosella jam in our future!

Eventually the chickens will have a permanent coop and run under this mulberry tree. Until then they get their very own little shanty town under the gum trees!

Thursday, 28 December 2023

Wildlife

 The wildlife around here are enjoying the hot weather and the rain we've finally had!

There's the usual birds, frogs, wallabies, possums and hares. But we've also been lucky enough to see echidnas and bearded dragons! In the mornings when I let the chickens out I've been seeing lots of cicadas shedding, which is pretty cool to watch - I don't think I've ever seen a cicada, just their shells. And we've unluckily had a few brown snakes around the house, makes me rather nervous when I'm gardening as they're pretty hard to see unless they're moving.


Tuesday, 15 September 2020

Extra handles on a dog lead

Archie is a bit of a handful and I experimented with short and long leads but found we needed both at different times on our walks. Sure we could just grab the lead down low, but as he got bigger and stronger it got more difficult to hold him close.

So I bought a longer lead and sewed two extra handles to make it easier to hold him close. Something so simple to do makes it so much easier to control our huge puppy on walks! 


I just used my normal sewing machine and a 14 needle and sewed back and forth a few times, he'll be turning one on Thursday and his old one is still holding up - he'll chew through the webbing before my stitches come apart! I sewed up a new one for his first obedience class last night, boy was he naughty!

Tuesday, 28 July 2020

Superworms

I know, lots of people think superworms are gross (my husband included!) but my chickens and quails love them! I used to breed the mealworms for them because they're easier to get to pupate than the superworms but then I got lucky and my container of superworms decided to start the process all on their own! 

The main reason I go through phases of breeding them is when they get a grain mite infestation in their bran - it is impossible to get rid of and grosses me out. I tried freezing and microwaving the bran before the eggs hatch, but it seems inevitable that they survive and take over. I've researched these guys a lot trying to find a different bedding solution but all I kept finding was bran or oats, so I started experimenting.

First up I tried no bedding but it ends up with a lot of moisture on the bottom and the worms started dying off. Then I tried sand but it also ended up holding a lot of moisture on the bottom of the container. I had tried them on fresh mulberry leaves, which they liked so I dehydrated and crushed so many leaves which worked well, but was a lot of work! 

Now occasionally when I garden where I used to compost all the quail bedding I kept finding what looked like elongated mealworms so I thought what about plain dirt? Obviously I didn't want to bring garden dirt in to hatch who knows what to contaminate my worm colonies (or my house!) - so what about those coir blocks that you add water to and they expand?


Yep it works great - they eat it just like they do with the bran and it doesn't hold a lot of moisture in the bottom as the worms help move it around, which in turn helps it dry out faster. And I've found it doesn't get as smelly as the bran either, I tried with a lid and without a lid - without a lid they stay even drier of course, but even with a lid I don't have moisture issues.

It wouldn't be as easy to sift out mealworms as the coir isn't as consistently fine as bran, but it's great for the superworms.

Tuesday, 21 July 2020

Puppy proofing the garden

I guess I shouldn't just call it puppy proofing when fencing off the gardens started because of the chickens. Luckily a short fence that I can easily step over and move works to keep both Archie and the chickens out!

And even better, flimsy, wobbly fences seem to work best! If it's nice and solid under his paws, Archie will happily jump and lean on it, but if it flexes or moves he won't touch it in case it falls and makes a scary noise (yep typical big dog, big sook)! For the chickens if it looks like it has a nice sturdy top they will happily land on it and jump in the garden. Like this fence we put around the mango tree - they liked to sit up there and watch the world go by!


These chicken wire and fence paling fence panels were my original chicken fences to keep them off the concrete and out of my pot plants. They have seen better days, and I'm surprised how well they've held up to Archie. A couple of panels have a new use as a rather rustic plant trellis for my snow peas. In front of those are puppy play pen panels which work great to keep the chickens out - and Archie. It's nice as they are cheap, easy to install and easy to see the garden (and mess) they're protecting. I do use garden stakes and zip ties for a little extra support.


Similar to the puppy pen panels I have an assortment of old panels off rat cages and compost cage panels which also work well with garden stakes and zip ties. They normally get used to cover Archie's excavation attempts so the grass gets a chance to grow back!

Since I can't trust Archie with the chickens I did want something a bit stronger between them. So I made some simple fence panels using only fence palings. I then either use screws or zip ties to attach to garden stakes, the chicken cage or the verandah posts. They look so much nicer, unfortunately they do block a lot of the view into my gardens - I think I'll save this type of fence for hiding messy areas! They are nice though as I can make sturdy gates for them with proper latches.


Once I've settled on a layout for our backyard we will do a permanent fence for the gardens, until then I'll stick with my current mix of panels. Who knows, by that time Archie might be too lazy to destroy my gardens and I won't need the fences anymore...

Tuesday, 14 July 2020

Birdhouse Gourds

Last year I finally planted two birdhouse gourd seeds to grow over the chicken coop - along with loofahs and snake beans. They did grow over the chicken coop, but they also travelled up our huge dracena, over the quail shed and along the shade cloth we hang over the bees.

With all the research I did, I was only expecting a few gourds from each plant. But only one plant survived to do all that travelling, and I now have so many gourds! Surprisingly the plant is only dying now wheras the loofah died off when the cold hit over a month ago.


Gourds can take months to dry, as they've dropped from the vine I starting making macrame hangers from twine so they have really good air circulation to prevent rotting. Then I just grabbed an old piece of wood from the yard, screwed in a whole heap of cup hooks and put it between the sheds. I read that they go mouldy and smell pretty bad as they dry out so I figure the junk pile won't mind!


It's working well, I have a few that seem to be fully dry and I haven't noticed any mould or any bad smells - not that I'm going to breath deeply or intentionally smell them when I get close.

Since that old piece of wood doesn't seem to be coping too well with the weight of the fresh gourds the rest will hang out on the mulch until I have room on the hanger. Gourd farmers do just leave them in the field over winter until they dry out so this shouldn't be a problem. Although I do wonder if contact with the ground might cause mould or rot issues.

The first thing I'm going to do is put a couple of small ones in with my finches to see if they like them. The main reason I wanted to grow them is to do pyrography on them. I've seen them used for bowls, spoons, yarn bowls, ornaments, planters, lanterns and of course they used to be used for water hence their other name of bottle gourd.

Tuesday, 26 May 2020

Native Bees

I found out about native bees many years ago and have been a little obsessed with them. We have planted lots more flowering plants and I have planted a small vegetable garden with flowers in between each crop.

Two years ago I started making a dedicated bee garden and we bought our first stingless bee hive from a local man who really knows his stuff! His hives are so well made and they look lovely in our garden.


Tetragonula Hockingsi
Then a few months later we bought our second hive in a huge log, to go in our completed bee garden - next to the chicken coop. (I love my crazy paving using random bricks and pavers)


Left to Right - Tetragonula Hockingsi, Austroplebeia
Then last year I extended the bee garden across where the chickens were so I could make room for yet another hive!


Left to Right - Tetragonula Hockingsi, Tetragonula Carbonaria, Austroplebeia
And then, once the hives are full I can add an empty hive to the front and hopefully end up with a new hive. This is called an eduction, the other way is to split the hive.


The bee garden has also become my orchid garden as they both enjoy shady summers and more sun in winter. I have shade cloth over this area that I remove once the weather cools down.

Tuesday, 12 May 2020

King Quail

So I absolutely adored raising my chicks and wish we could have a rooster where we live so I could raise them over and over! Since caring for and breeding quails are similar to chickens, and they aren't classed as poultry, I decided to breed them instead. 


I experimented with incubating them and allowing their parents to incubate naturally. I sold lots of pairs but most people want females so I ended up with a lot of males and no more space since each clutch of males needed their own cage. I ended up selling my breeding pairs and now have around 15 males running together in the bottom of  "the quail shed". I have to say it is so much easier to have them on the concrete floor rather than having to clean a million cages, and they don't fight as bad now that they can get away from each other and have more room to run around and burn off that excess energy.

Let's face it, quails don't use all that space in the top of the cage so why not add finches! Most of them were given to me as they were special needs or disabled. Once I put all the quails on the floor of "the quail shed" I moved all the finches into one big cage, but still in the shed as it is mouse proof.

I had loads of fun raising them, but king (button) quails are not as friendly as chickens, they will snatch mealworms from my fingers, but they don't want to be petted, picked up or cuddled. The boys are between 2 and 3 years old so I don't have plans for more quail breeding for a long time!

Tuesday, 14 April 2020

Introducing Archie!

After losing Trixie, our house felt so empty without her, we didn't want to be there and we didn't want to come home. We went to an adoption day to look for a puppy and it might have been too soon, but then again it might always be too soon. It was so busy, there were heaps of people and we were overwhelmed so we left. Then looking online at all the rescues and still being unsure, we decided to foster some puppies. So we got 3 little puppies and they all found homes a few weeks later. Then we got two more puppies and ended up adopting Archie, a wolfhound cross.


Archie @ 6 weeks

Archie loves hugs, people, other dogs, water, digging, chewing, biting, eating anything and everything, he is a chatterbox and a clown, chases brooms and mowers, he is a shoe thief, a scaredy cat of anything new and has trained the neighbour to give him pats and treats. He is very different to Trixie in looks and personailty... oh and size! I can't trust him with my chickens, he caught one of my quails (I need to tell you about those) and he chases the cats and barks at them non stop. 


Archie @ 3 months

Our house and backyard now have puppy gates and fences - luckily he doesn't realise he could easily climb over them. It is amazing that I forgot just how much work there is in raising a puppy, I can't wait for the day he calms down, unfortunately we're in for a long wait!


Archie @ 5 months

Tuesday, 7 April 2020

Chickens!

Things have changed a lot in the last 4 years with our pets. 

After babysitting chooks for my parents for over a month I managed to convince Ray that we needed our very own chickens! It wasn't because he likes chooks, after all he is allergic to birds, but he did notice how much better backyard eggs taste.

I started off by getting sexed week old chicks, one welsummer, one plymouth rock and two barnevelders. The welsummer wasn't a welsummer, the plymouth rock was a boy and the barnevelders died at 1 week and 9 weeks old. 

Since we can't have roosters here I needed to get some more chicks so I found some four week old chicks and ended up with  two wyandottes and a sussex. And then to better my chances at getting girls I got two super cute araucana cross chicks that were 2.5 weeks old. They all ended up being girls!

I rehomed the rooster and three of the girls which left me with Petal the silver laced wyandotte and the araucana crosses Calla and Blossom. 

Blossom is totally my favourite, so much so that I let her hatch some hamburg and marans eggs so we could add to our flock. Last year on New Years Day 7 out of the 8 eggs hatched and we kept Violet the french wheaten maran, and still have two of the gold spangled hamburgs. I haven't settled on names for the hamburgs as I'm still undecided on whether I want to keep them.


Blossom with the hamburg chicks, she is such a good mum and even fought with her sisters if they got too close!

Friday, 8 April 2016

Cat Rescue Charms

I foster kittens every now and then for my local cat rescue. I shared a photo of my foster cat Chaos in a post about a wood burnt cat spoon, he is my cat now. My husband finally let me keep him after Chaos got crystals in his urine, I guess he saw how upset I was at the possibility he might die. Either way, Chaos is a special little character and luckily he has found his forever home with me.

Our rescue has wonderful creative supporters that donate their handmade items for us to sell so we can raise money to care for unwanted cats and kittens.

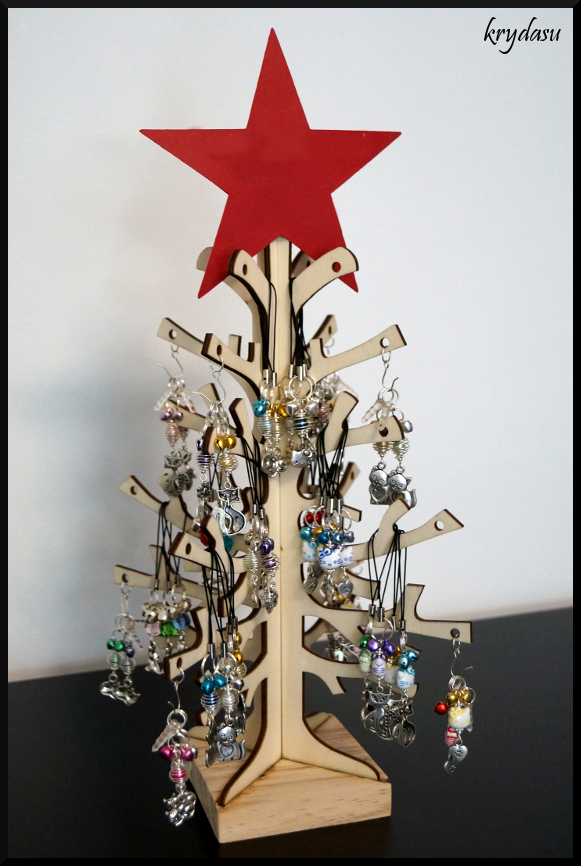
We had organised a market stall so I decided I would make a whole lot of cat phone charms that we could sell. After the market stall I needed to make a stand so they could sit at the vet where we get all the vetwork for our rescue cats.


I made some of the phone charms with the loops used for the older phones that had the little spot to loop it through. They still work great to attach to keyrings, zips, car mirrors, etc. But they don't work with new phones, so I found earphone dust plugs to create charms for those phones.

The tree stand I got for Christmas time originally had bells in all the holes and wasn't very stable with all those charms on it so I made a base and glued it in place. The original charms with loops hung off the branches easy enough. The dust plug charms didn't fit over any branches so I used the holes where the bells were and attached an earring hook with a jump ring so I could hang them.

I didn't take a photo of the non Christmas tree I made, but I just drilled holes and inserted wire to create a hook on either side of the branches.

These trees are a great way to display small items for sale - and they don't need to be specifically for jewellery.

Friday, 30 October 2015

Easter Bunny Shirts

For Easter this year I made my little niece and nephew matching Easter bunny shirts.


I made my stencils on my silhouette machine with contact paper (vinyl), it makes it a lot easier to paint as you don't need to worry about the stencil moving. 

The super cute bunny image on the top shirts is from the blog Petti Bear - although the intended use is as a wall sticker. I think it is great for tshirts too :)

The bunnies on the bottom shirts were from the Silhouette Online Store - unfortunately I didn't iron the paint properly and some of it washed off. Luckily it still looks cute :)

Friday, 21 August 2015

Wire Shrimp

At the start of this year I entered a art/craft competition to make a shrimp so I made this cute wire wrapped shrimp.


This little guy took me about 6 to 7 hours, which seems to be the usual amount of time that I spend on my wire sculptures. He won me first place in the competition, which were some goodies for my shrimp tank.


These are cherry shrimp, very difficult to take photos of as they are so small, but they are super cute! I just don't have much luck with them thanks to my water and how hot it gets in summer.

Friday, 10 July 2015

Loopy Bee

Since getting a Silhouette machine, I have been having a lot of fun making a lot of onesies for my baby nephew and niece, along with a few shirts for my first nephew. One day I just felt the need to completely redesign my crazy bee design so I could paint it on some onesies for the babies.

These are my original crazy bees, which would have been perfectly fine with a lot less time staring at the screen. Click here to go to the blog post with the template and instructions to make felt magnets!


I am glad I decided to redo my bee, this new design looks so much cuter for onesies. Plus I did a much better job of the graphics for this one. Unfortunately I didn't take a photo of the first one I painted with the original design.


Friday, 26 July 2013

Padded Camera Strap Cover

We spent a lovely day at Australia Zoo this week, which meant playing with my new camera. Luckily the day before we went to the zoo I decided to try out the bigger lens when we took Trixie for a walk - the strap that comes with the camera is incredibly uncomfortable, especially with the heavier lens!

So that night I quickly made a padded cover for my camera strap!


The padding in the strap really helped my neck, while the zebra fabric matched the zoo theme - in particular the African exhibit!


Using the bigger lens was definitely worth it to get photos as close as this! I will be making myself a new strap with a lot more padding before our next big outing.

Thursday, 23 May 2013

My Pets

On Saturday Karen from Sew Many Ways will be hosting Annie's Pet Palooza Birthday Party for her labrador Annie's 13th birthday!

I have always been an animal lover which of course means I have pets!

Nearly six years ago we got our first kitten - even though this kitten was meant to be Ray's, Dash is definitely my cat! The very first time I first picked him up he snuggled his head into the crook of my arm and licked my elbow. 
He has grown up to be a very vocal cat - especially when I am on the phone. He is gentle and actually stops playing rough when I say "ow". I taught him to sit for his treats and he also loves to sit on my shoulder or back. Being a typical cat, his favourite thing to do is sit in front of my computer or on top of any project I'm working on!


When we finally bought a house with a good sized yard we got a puppy who I named Trixie! She was a terrible biter as a puppy and I still have a couple of scars - and lots of holey clothes. The puppy biting phase was the only puppy issues we had, so I believe we were very lucky! Now however she is going through her teenager phase so I guess our luck has run out.
Being a border collie x kelpie we were expecting a high energy dog, mostly though she is pretty lazy. She loves to play fetch with pretty much any toy - with her favourite being the orange ball - well it was until I taught her to play frisbee!


And of course my rats! I have five at the moment and I still can't decide on names for them. They really do make great pets - although they are impossible to photograph! This is my new super friendly little fella that I got last week.


Then there are the fish which include my two male fighter fish, as well as our big tank that currently has a red tail black shark and some harlequin raspboras.


And I can't forget our most unusual pets - the snakes. We have two stimson pythons named Stellar and Theo and two bredli pythons named Mika and Bitey. Stellar is by far my favourite of all the snakes and she is the first one we bought. She is currently in hibernation which she chooses every winter, meanwhile our other snakes are still happily eating as the temperature drops!


Happy Birthday Annie!

Friday, 19 April 2013

No sew bird tent

My SIL just got a parrot and with winter coming up he needs a snuggly bird tent!

I know my SIL is worried about birds chewing fabric and rope and then getting it stuck in the crop, around their feet, etc. so I decided to make a no sew bird tent to avoid any sewing threads being chewed loose. As well as not sewing this bird tent I used polar fleece as it doesn't fray  - obviously this will still cause problems if the bird ingests bits of fabric so I'm hoping he doesn't enjoy chewing his new bed!


Since I was just figuring this out as I went along, all I can do is explain my process:
  1. Cut a base to 16cm x 11cm in order to support your bird - I used a takeaway container lid, just make sure it is plastic so your bird tent can be washable!
  2. Cut 2 rectangles from your polar fleece that are 22cm x 45cm. (this makes the sides 16cm x 14cm)
  3. Cut your notches 3cm into your fabric and space them 1cm apart. Do this for all four sides
  4. Next you need to secure your base between the inner and outer fleece layers directly in the middle. Snip some holes along each edge of your base and tie the layers together with your fleece strips. My strips were 1cm x 10cm and I used four of them for each side.
  5. Now the fun part begins - start tying the knots all around the outside edges...
  6. Lastly just poke some hanging holes through the tops with paper clips and your new bird tent is ready to hang!
I hope that makes sense for anyone who wants to make their own no sew bird tent!

Friday, 31 August 2012

Canberra Holiday Photos

I wanted to share a few of the photos I took on our trip to Canberra now that we are home. I used my phone to take photos so they aren't great but it certainly makes sharing them easier! 

First up we went to the Australian Reptile Park, which doesn't just have reptiles... 

Look at the turtles eyeing the Sail-Fin Lizards tail 


This is the Australian Institute of Sport where you can take a tour... 


The Australian National Botanic Gardens... 


One of the many beautiful trees flowering this time of year... 


This place was great, most of the snakes and lizards were active while I was there, the man working there was really nice and very knowledgeable. If you ever visit Canberra I strongly recommend you visit them. 


The Australian War Memorial... 


Taronga Zoo... 


I love visiting new zoos so I was pretty lucky to visit three of them this trip. My husband was working so unfortunately we didn't have the time to visit the Canberra Zoo. I do have some more crafty things to show you soon - I need to finish unpacking and get all of our clothes washed first!

Friday, 20 July 2012

Blobby Scotty Dog

I wanted to share my latest "blobby" drawing with you. This one features the silhouette of a Scottish Terrier.


For this drawing, I tried to do my "old style" but I don't think I like it. I really liked the look of it with the female silhouette so maybe it has something to do with the simplicity of the base image.

This drawing will probably need to be redone in the "new style" before I can decide if I like it!