Showing posts with label origami. Show all posts

Thursday, 20 June 2013

Origami Cymbidium Orchid

For the month of June, I decided to make the Cymbidium Orchid origami flowers from the book "Origami Flowers: Popular Blossoms and Creative Bouquets".

These flowers took me a couple of tries mainly in getting the coloured section to end up in the right place! I'm also not entirely sure of how to crease it properly in the final step.


I probably won't make these again, especially when I have an advanced origami book with a beautiful orchid in it! I'll have to give that flower a go again one day just to share it with you - as well as try out some more pieces from that book.


Origami flowers I have made from this book:
January: Balloon Flower
February: Blue Star
March: Cyclamen

Friday, 31 May 2013

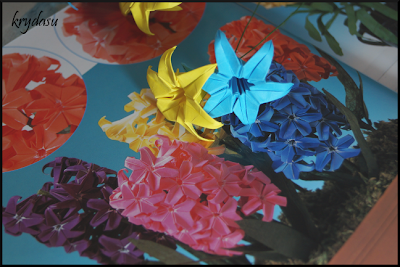
Origami Hyacinth and Morning Glory

Last week I was checking my blog so I could choose an origami flower for May when I noticed I had completely forgotten about the Morning Glory flowers I made last month! For whatever reason I really believed I had not only taken the photos, but also published a blog post about them - obviously I need to do some brain exercises...

For April I decided to try out the Morning Glory origami flowers from the book "Origami Flowers: Popular Blossoms and Creative Bouquets".

Apart from starting with a hexagon, these ones were quite easy to make. While they were quick to finish, I don't really like them and probably won't try them again/


For May I went with the Hyacinth origami flowers since I had mastered the fold needed to make the hexagon paper. 

I really like these flowers, however being a hyacinth you are supposed to attach about 20 of them all to a thick piece of wire. I decided I liked them as single flowers so I suppose they aren't really a hyacinth anymore!


I am thinking of making templates for all of the odd shapes rather than doing the special folds using square paper - especially since the original folds aren't always needed for the flowers. Either way it certainly is interesting to learn new origami techniques.


Origami flowers I have made from this book:
January: Balloon Flower
February: Blue Star
March: Cyclamen

Friday, 5 April 2013

Origami Cyclamen Flowers

For March I chose to try out the Cyclamen origami flowers from my book "Origami Flowers: Popular Blossoms and Creative Bouquets".


The cyclamen is a cute little flower, and I did once have a live plant - but I didn't do so well at keeping it alive. Besides that, indoor plants don't tend to live very long with indoor cats!

This flower was a little difficult to shape at the end, but they still turned out pretty cute! I do wonder if a thinner paper might work better for this flower - either way I quite like this particular origami flower.

Origami flowers I have made from this book:
January: Balloon Flower
February: Blue Star

Tuesday, 26 March 2013

Origami Blue Star Flowers

Today I was planning a post for the newest origami flower I learnt to make using my book "Origami Flowers: Popular Blossoms and Creative Bouquets" when I realised that I didn't post about the ones I learnt to make last month!


In January I tried out the Balloon flowers, and in February I opted for the Blue Star flowers.


This flower is a little awkward to make, but they turned out quite cute! I don't have the correct type of paper for the leaves, but my memo paper is great to practice origami with!

I am also doing a lot better with the floral tape, so I guess it was just me and not the tape that had issues!

If you are interested in origami flowers, keep checking back as I'm hoping to complete a new flower from this book each month of 2013!

Tuesday, 5 February 2013

Origami Balloon Flowers

One of many ideas I had for my wedding was to make an origami flower bouquet so I asked my dad to buy me the book "Origami Flowers: Popular Blossoms and Creative Bouquets" by Hiromi Hayashi. 


I attempted a few of the flowers, failed and promptly gave up as I just didn't have the time to work at it. After going through my boxes of books and finding this one again, I decided that I would like to work my way through this book and create all of the flowers! 

For my first flower attempt I chose the balloon flower as it looked relatively easy and only used one sheet of paper. 


So once I got the cutting of the paper correct, I found this flower to be pretty easy to do. They turned out alright which is the main thing! 

I made this rainbow bunch of origami 'get well soon' balloon flowers for my SIL. 


I didn't wrap any paper leaves into the stems, but there are templates in this book that you can trace and cut. I was having problems with my floral tape, I don't know if it was the tape or just me - either way I guess I will find out when I buy a new roll. The instructions said to use a piece of yellow floral tape for the center but I didn't have any so I just rolled strips of yellow paper around it. 

Hopefully I do this well for the next flower I choose!

Sunday, 16 December 2012

German Paper Stars

I went a little overboard recently when I found a tutorial for a really cute paper star! I was orginally looking for origami Christmas ornaments when I found some instructions on how to make these German Paper Stars. The instructions I found were far to confusing but after a little more searching I found a great YouTube tutorial. I still had to pause and go back a few times but it was easy once I worked it. 

And after cutting far too many strips of paper, I now have some new ornaments to add to my tree... 


I haven't decided what to do with the little stars yet, maybe a garland for the window - I may have to make more though and I'm not sure I'm up to it anymore! 

If you are up for a paper folding/weaving challenge you really should give these stars a try. And might I suggest you don't start making them with 6mm paper strips like I did. I really don't know what I was thinking when I cut all those strips! 

I have lots more of my crafting adventures to share with you, once I get the time. You gotta love Christmas...

Friday, 10 August 2012

Origami Balls Vase

You might remember this post where I told you about the vase I filled with origami lucky stars - although technically its the vase that is filled with toilet paper tubes and lucky stars. 

Well, I have finally made enough small origami balls to fill up my other large vase! In my origami book these are actually called the multiplex challenge. I have to fold 12 sheets of paper which are then slotted together to create these origami balls. 


And yes, this one is actually full of origami balls, no cheating for this vase! 

For my next vase (when I find the right one) I have started on origami cubes, I need something to do while I watch TV!

Sunday, 11 March 2012

Coiled Magazine Coasters

I thought I would show you my coiled magazine coasters.These are the coasters I made for our first house. We didn't really have any spare money to waste on things like coasters when we needed things like furniture, vacuums and microwaves. So a late night search and I found photos of coasters people had made from strips of magazine pages.

Perfect - old magazines and sticky tape. I never bothered putting felt on the bottoms or decorating the edges with ribbon, I like them how they are. After 3 years I am only down 3 coasters - they have lasted longer than the ones I bought at a store!


I did an internet search and found this tutorial which explains how to make the coils. I kind of made it up according to what I thought was easier when I made mine.

A quick run down for my way of folding the paper (let me know if you would like me to create a photo tutorial).
  1. Cut strips from your magazine lengthwise that are 2 inches wide - you will need a lot of them so use a paper cutter or guillotine.
  2. Fold each piece in half lengthwise.
  3. Now fold the 2 lengthwise edges down into the middle.
  4. You will now have strips of paper that are 1/2 inch wide. One side will have 1 folded edge, the other will have 2 folded edges.
  5. When making my coasters I flipped my strips each time. Coil your first strip as tight as you can with the 1 folded edge facing up, then use a little bit of tape to tape the end to your coil. 
  6. Take your next strip and with the 2 folded edges facing up this time, tape your new strip to your coil (make sure you butt it up against the end of the previous strip).
  7. Coil it around and tape the end.
  8. Keep repeating, ensuring to alternate the folded edges.
The tighter you wind your coils, the better it will look, and the better it will stay together. You will know if you are coiling tight enough when you feel your hands cramping!

And yes people will play with these. The will push the centres up and in some cases destroy the coasters. If you don't want this to happen, I suggest you glue felt on the bottom. People just don't realise how long it takes to finish one of these coasters!

Tuesday, 6 March 2012

Origami stars and a vase

We got given a few vases as wedding gifts that are too big to use for cut flowers, but too small to safely keep on the floor - especially with cats.

So I found all my little origami lucky stars and put them in one vase. Unfortunately I didn't have many and it looked rather silly. So I started keeping a box of paper on the coffee table so I could fold paper stars while watching tv. I finally had a decent amount but just could not be bothered to make enough to fill the vase up completely - and I have absolutely no blue paper left!


Would you believe me if I told you that the vase on the left actually has less stars in it than the vase on the right?

Yep, that's right, I cheated and I wanted to share it with you. I mean you could do the same thing with a jar of buttons, beads, dice, gemstones, shells, and the list could go on and on and...

All you need is paper, tissues, toilet or paper towel rolls, scissors and sticky tape! Actually you could even omit the tissues and scissors.

Here is what I did:

  1. Gather your supplies.
  2. Sticky tape your toilet rolls together.
  3. Sticky tape paper around the 2 rolls.
  4. Use your tissues (easier to mould them flat than it is with paper) to cover the top and bottom holes.
  5. Make as many as you need to fill your vase.
  6. When you start filling your vase, just do one section at a time, making sure that your stars have hidden the toilet paper rolls. I actually compacted mine a little to make sure it all held in place and didn't settle later on.
And there you have it - a time saving illusion!

If you want, make a lid for your vase to stop it getting filled with dust.


I used a stiff piece of plastic from the carton of a salt and pepper grinder set. Just sit it on top of your vase, trace the edge with a permanent marker, cut it out and use Blu Tack to hold it in place. You can remove the permanent marker using metho.

It works great for fish bowls as well, just make sure you have a hole cut out for air. It also stops the cats drinking the fish bowl water!

Now I still have another glass vase to fill...

Friday, 16 September 2011

Wedding - Part 2

Well I took the last photos if my wedding crafts, so here are the rest of my ideas and craft projects.

I love growing chilli plants, purely because of the way they look and luckily the colour of chillis matched the red theme for our wedding! So for my centerpieces I wanted living plants. Originally I considered bonsais but I don’t have much experience with those. Then I decided to use some glass bowls I found at Ikea to make a kind of terrarium with chilli plants and succulents. Unfortunately the plants didn’t grow as fast as I hoped so they had no chillis on them for the wedding, they had started flowering which was better than nothing!

I also made little origami lights using vellum then popping leds connected to batteries inside (basically LED throwies). They took me forever to fold as I made 50 of them but I now know how to make them without the instructions and they are easy enough that I can watch tv at the same time!


I didn’t want a normal wedding cake because we were already having dessert so not many people would eat the cake anyway. I was considering cupcakes, and also cheesecakes with all different sauces that people could put on themselves. Then I decided that lamingtons would look cute and they tasted so good especially since I got them with jam inside. I also got a lamington cake purely for the cake cutting. Best thing was it only cost $100 for the cake and about 60 lamingtons from a local bakery!

I bought a bamboo cake stand which did have a pole handle on the top section so I just bought a bolt to hold the top plate on without the pole. The cake covered it so no one even knew.

The cake toppers, I originally wanted those rhinestone letters and started making them. Then I changed my mind and started making little clay pandas with a bamboo stand. But that didn’t work out too well and I never bothered to finish… maybe one day so I can add it to my panda collection. In the end I used a set of salt and pepper shakers that my big sister bought me - they are kissing pandas that have magnets for mouths to hold them together.

To add to my little addition of chillis to the wedding I made little chillis of out marzipan that I coloured with food dye. They were quick and easy to make and looked cute sitting on top of my lamingtons. I made them a couple of days before the wedding as they absorb moisture easily.


For my invitations I spent ages designing and carving  a bamboo stamp for the invitation and another one for the envelope. They worked well until I super glued them onto pieces of wood – I guess it needs to stay flexible. In the end I just scanned the image into the computer and printed it off at the same time as the invitation text.

My favourite DIY from the wedding was the jewellery! I used swarovski crystals, black onyx, moonstone, myuki seed beads, metal spacers and lampwork beads and more I am sure. I learnt a lesson when making jewellery – give your hands a break otherwise you can’t get anything done because your fingers are so sore after days of twisting wire!  I actually didn't get any specific photos taken of the jewellery I made for the wedding but afterwards I took photos of what I made for myself in case I lose them or break them.

Monday, 12 September 2011

Wedding - Part 1

When we started planning our wedding I wanted to do as much DIY as I could – obviously I couldn't do as much as I wanted but I thought I could share my ideas with you.

I wanted our wedding to be a bit different, not what everyone was expecting. For starters I wore a red and black dress that I got made in China. It was my second dress that I ordered as they made it to the wrong measurements. I chose a different company, and a different dress and got it made in a standard size – which didn’t fit me properly. I took it to a dressmaker to get it fixed but she said no (because she believed a bride should wear white)! So my talented mum fixed my dress and made it perfect! She also made her own dress while fixing mine and also altering my little sisters bridesmaid dress and making the sash I wanted.

Instead of holding bouquets of flowers I bought lace parasols that also had matching fans - mine were black and my sisters were white. I spent a lot of time trying out origami and beaded flowers but I didn’t really like any that I made.


Instead of flower boutonnieres I made them using feathers that I dyed red and black. I made those for my husband and his best man, our fathers and grandfathers and for our mums and grandmothers I added some beads in with the feathers. I also made mine and my sisters hair pieces out of the red and black feathers but added peacock feathers as well.


For our bon bons I wanted something different that reflected both of us a little. I found these mini metal bookmarks that you could decorate yourself and thought they were perfect. Ray and I both enjoy reading, as does a lot of our family so I thought they could be rather handy for a lot of our guests. They worked out to about $1 each in materials. I used moonstone because I like the colourful sheen they have in them. These also started the ideas I had for the full size metal bookmarks I make. We also had little red heart lollipops on the tables for the guests.