Showing posts with label dog. Show all posts

Tuesday, 1 December 2020

Big Brother Bandana

I made a bandana for our dog to announce to our parents that we're having a baby! We're due in April so I really need to start making things for our baby, so far I've got some tie dye onesies ready, but I want to start sewing some gender neutral outfits since we don't know if it's a boy or girl.

It was pretty simple, I sewed up a bandana just by copying one of the bandanas we already have for Archie since they fit him well. Then I printed up what I wanted written on the bandana, taped the bandana to the piece of paper, then taped all of it to the window on a sunny day and simply traced it with a permanent marker. 

I used a thin cotton pillowcase (that Archie chewed a hole in!) as it was easy to see the writing through the fabric. Originally I tried making one using an old tshirt so I didn't have to sew anything, but it was difficult to see through. I'd recommend using the woven cotton as the stretch of the tshirt fabric caused the marker to drag and it didn't look very nice. 

Tuesday, 21 July 2020

Puppy proofing the garden

I guess I shouldn't just call it puppy proofing when fencing off the gardens started because of the chickens. Luckily a short fence that I can easily step over and move works to keep both Archie and the chickens out!

And even better, flimsy, wobbly fences seem to work best! If it's nice and solid under his paws, Archie will happily jump and lean on it, but if it flexes or moves he won't touch it in case it falls and makes a scary noise (yep typical big dog, big sook)! For the chickens if it looks like it has a nice sturdy top they will happily land on it and jump in the garden. Like this fence we put around the mango tree - they liked to sit up there and watch the world go by!


These chicken wire and fence paling fence panels were my original chicken fences to keep them off the concrete and out of my pot plants. They have seen better days, and I'm surprised how well they've held up to Archie. A couple of panels have a new use as a rather rustic plant trellis for my snow peas. In front of those are puppy play pen panels which work great to keep the chickens out - and Archie. It's nice as they are cheap, easy to install and easy to see the garden (and mess) they're protecting. I do use garden stakes and zip ties for a little extra support.


Similar to the puppy pen panels I have an assortment of old panels off rat cages and compost cage panels which also work well with garden stakes and zip ties. They normally get used to cover Archie's excavation attempts so the grass gets a chance to grow back!

Since I can't trust Archie with the chickens I did want something a bit stronger between them. So I made some simple fence panels using only fence palings. I then either use screws or zip ties to attach to garden stakes, the chicken cage or the verandah posts. They look so much nicer, unfortunately they do block a lot of the view into my gardens - I think I'll save this type of fence for hiding messy areas! They are nice though as I can make sturdy gates for them with proper latches.


Once I've settled on a layout for our backyard we will do a permanent fence for the gardens, until then I'll stick with my current mix of panels. Who knows, by that time Archie might be too lazy to destroy my gardens and I won't need the fences anymore...

Thursday, 23 May 2013

My Pets

On Saturday Karen from Sew Many Ways will be hosting Annie's Pet Palooza Birthday Party for her labrador Annie's 13th birthday!

I have always been an animal lover which of course means I have pets!

Nearly six years ago we got our first kitten - even though this kitten was meant to be Ray's, Dash is definitely my cat! The very first time I first picked him up he snuggled his head into the crook of my arm and licked my elbow. 
He has grown up to be a very vocal cat - especially when I am on the phone. He is gentle and actually stops playing rough when I say "ow". I taught him to sit for his treats and he also loves to sit on my shoulder or back. Being a typical cat, his favourite thing to do is sit in front of my computer or on top of any project I'm working on!


When we finally bought a house with a good sized yard we got a puppy who I named Trixie! She was a terrible biter as a puppy and I still have a couple of scars - and lots of holey clothes. The puppy biting phase was the only puppy issues we had, so I believe we were very lucky! Now however she is going through her teenager phase so I guess our luck has run out.
Being a border collie x kelpie we were expecting a high energy dog, mostly though she is pretty lazy. She loves to play fetch with pretty much any toy - with her favourite being the orange ball - well it was until I taught her to play frisbee!


And of course my rats! I have five at the moment and I still can't decide on names for them. They really do make great pets - although they are impossible to photograph! This is my new super friendly little fella that I got last week.


Then there are the fish which include my two male fighter fish, as well as our big tank that currently has a red tail black shark and some harlequin raspboras.


And I can't forget our most unusual pets - the snakes. We have two stimson pythons named Stellar and Theo and two bredli pythons named Mika and Bitey. Stellar is by far my favourite of all the snakes and she is the first one we bought. She is currently in hibernation which she chooses every winter, meanwhile our other snakes are still happily eating as the temperature drops!


Happy Birthday Annie!

Tuesday, 19 March 2013

Denim Jeans Dog Bed

A long, long time ago (probably last year) I was walking past a window display and saw a rug and bean bag made from jeans. They looked great and of course I had old jeans with ripped knees that I no longer wore.

Rather than make a traditional style beanbag I wanted to make her a round cushion type bed so I made a template and spent forever coaxing thick layers of our old jeans through the sewing machine... I finished the top and then it got put in a box and forgotten about!

Trixie had a beanbag that she loved as puppy which has been sitting in the garage since her and Alfie ripped holes in it while playing tug of war with it. Since she already spent one winter without her snuggly bean bag I thought I had better get her new denim cover finished for autumn.


Now that it is finally finished I'm happy with how it looks, Trixie thinks it's comfy and she has a ball when I put her toys in the pockets!

The bottom and sides were much easier to sew since I cut the jeans up and simply used them as fabric. I quite like the bottom, and I'm thinking of making a denim cover for our Poang armchair... that hasn't been added to my list yet!


What did I learn with this project? That bean bags need long zips, otherwise it is a pain to fill them with beans. It is horrible and frustrating to sew through multiple layers of old jeans! The wrong side of denim sometimes looks really cool - I mixed and matched the different jeans as well as using the right and wrong sides for this project!

Just because it is cute, I thought I would share this scrapbook collage of Trixie on her new bed.


All I need to do now is figure out where to put her bed, at the moment it is in her favourite spot at my desk - where I have to move it constantly and climb over it!

Trixie's new bed was featured over at I Gotta Create!


Linking up here:

Manic Monday @ Serendipity and Spice
Transformed Tuesday @ PJH Designs
Sew Darn Crafty @ Sew Many Ways
Whatever Goes Wednesday @ Someday Crafts
Fluster's Creative Muster @ Fluster Buster
Wildly Original Link Party @ I Gotta Create!

Tuesday, 12 March 2013

Trixie's Birthday Collar

It's Trixie's 2nd birthday today! When I got her as a puppy I wanted to make sure I took more photos of my pets - when they are babies I take heaps of photos and then I stop using my camera again. So every year I plan on taking photos of Trixie and Dash on their birthdays - and by take photos I mean that I want nice, clear photos of them with a nice background!

Trixie is normally great for photos, except she has been very naughty lately so the majority of the photos I took are of her looking away...


The middle one turned out the best but I just had to make a simple collage in MyMemories to remind me of this years photo attempts! Hopefully she behaves better for next years photos and that my garden has grown some more to give a nice backdrop.

Since it was her birthday I had a great reason to make her a new collar! I reused all the old hardware and this time I bought a purple ribbon with white birds printed on it. I didn't make it long enough for many adjustments though, luckily she stopped growing last year!

Friday, 20 July 2012

Blobby Scotty Dog

I wanted to share my latest "blobby" drawing with you. This one features the silhouette of a Scottish Terrier.


For this drawing, I tried to do my "old style" but I don't think I like it. I really liked the look of it with the female silhouette so maybe it has something to do with the simplicity of the base image.

This drawing will probably need to be redone in the "new style" before I can decide if I like it!

Thursday, 24 May 2012

Alfie's new jumper

I looked after Alfie recently as his owner was in hospital

I have to say anyone who fosters dogs must be saints! I am lucky in that I knew Alfie and had some idea of what to expect when I brought him home. As for the people who foster dogs from animal shelters without knowing anything about the dog and having the patience to work with that dog until it finds a new home, I honestly don't know how they do it!

I realise now that Trixie is a really well behaved dog. Sure I don't know what she would be like if she was in Alfie's situation, but for now I am going to believe people when they tell me she is a good dog.

In Australia it is Autumn and the last two nights have been pretty cold. Alfie is a destructo dog so there are only 2 blankets left for the dogs. I recently made Trixie a test jumper from an old sheet which turned out pretty good even though it was too long. Because Alfie has such short hair and very holey blankets I decided to attempt a jumper for him as well.

Because I don't have any large  pieces of material hanging around the house, I had to get creative and recycle! I used the cover from an old foam mattress for the outside of his jumper - I have no idea what the material is but it seems like it may be water resistant which will be good if he needs to go to the toilet when it is raining. For the inside I used an old cotton curtain from when we moved into this house. And sandwiched between the outer pieces for warmth I used the polar fleece blanket we have on the couch - luckily I was considering giving those to Trixie and Dash once it got colder!

As someone who still isn't confident with or good at sewing, I am very happy with Alfie's jumper! There are a few things I need to tweak but its good enough. I guess the added bonus is that he kept it on all night without getting it off and destroying it. It really is impossible to get a good photo of Alfie, so here is one where he was at least standing still showing off his jumper! And Trixie in her too long jumper.


All that white fluff is from Trixie's pillow that she has had since she was a puppy. The orange, yellow and grey scraps are from 3 destroyed blankets. Like I said... destructo dog!

And here is a photo where Alfie is looking at the camera!

Monday, 19 December 2011

Holly Collar Tutorial

Here is the tutorial to make your own felt holly collar for your pet, as modelled by Trixie!


  1. Cut a piece of the red felt long enough to fit around your dogs neck – remember to take into account the overlap for the Velcro – and 4cm wide (choose the width based on what you think will look best on your dog).
    Trixie’s neck is 33cm and my piece of Velcro is 3cm = 36cm long x 4cm wide piece of felt.
    Cut 1 piece of interfacing slightly smaller than your red piece of felt and iron on. 
    For your holly leaves, draw the design onto your interfacing then iron the interfacing to your green felt. This will make it easier to cut out your holly leaves
  2.  For this step I chose to sew along the long edges of the red felt and down the centre of my holly leaves. I didn’t sew down the centre of the holly leaves on the cats collars so take a look at their photos to see what you prefer.
  3.  Attach your Velcro to the collar – making sure you attach one end to the front on the collar and the other end to the back of the collar. I just used tacky glue but you could sew it if you prefer.
  4. Next you need to sew your holly leave onto the collar – you could glue this part as well if you prefer.
  5.  For this collar I used some 2cm baubles as I didn’t have enough of my big bells. Just sew a couple of loops of thread through the hanging holes of each bauble (or bell).
  6. All finished – a very cute and quick Christmas craft project!

Friday, 16 December 2011

Christmas Collars

Well I have been busy making all my Christmas gifts for this year. I have also made collars for the cats and the puppy!
For Trixie I made the Holly Ascot Collar tutorial that I found on the Martha Stewart site.
Link here.
Trixie looks very cute in her Christmas collar and it doesn't seem to bother her at all.


As for the cats I used some felt scraps to make theirs and some tiny little red bells. I plan on making one of these for Trixie as well as I think it looks much cuter and at the same time I will make a tutorial so everyone can make a simple collar for their pets.
I think the little holly leaves and bells would look cute as a hair piece as well!

Thursday, 17 November 2011

Trixie's new collar

I decided I wanted to make Trixie a new collar and started pulling apart old ones to see if I could actually sew a nice collar before buying supplies.

I am very happy with it so I also made her a matching lead. I decided to embroider her name and phone numbers on the ribbon for this collar as well since she always loses her tags anyway. Now I just need to hope she doesn't lose her collar as well!

It is nice that Trixie can have a collar different to all of her doggy friends. Next is buying supplies to make collars for the cats...


Friday, 4 November 2011

Ribbon dog tag

We had the need to buy Trixie a zappy collar after receiving a threatening letter about her barking! Not that she barks much because I have her inside - but better safe than sorry. I am home most of the time so she doesn't need to wear it very often, but we have a wedding to go to next weekend and she will be wearing her zappy collar. Because the collar I bought works through vibrations I can't have any tags hanging from her collar or have her wear her normal collar. I don't want to leave her alone without a name tag in case she escapes or gets let out, even though she is microchipped.


Enter Trixie's new ribbon tag...

What you will need:
  • A ribbon either the same width or smaller than your collar
  • A candle or lighter
  • Needle and thread (I used regular sewing machine thread but you can use embroidery thread)
  • Scissors
  • Marker
  • Lamp or lightbox
  • Sticky tape
  • Optional: Name and phone number printed off your computer
  • Optional: Sewing machine
I chose to print off Trixie's name and my mobile number only since I won't be home anyway. I did it in all different sizes then just cut out the size I chose. You can just write directly onto your ribbon if you prefer.

You will need to either write or trace your text onto the ribbon. I don't have a lightbox so I just used my lamp by taping the piece of paper onto the lamp. Now you will need to line up your ribbon and tape it down as well. I just used a texta to trace the text lightly onto the ribbon as a guide for my embroidery.


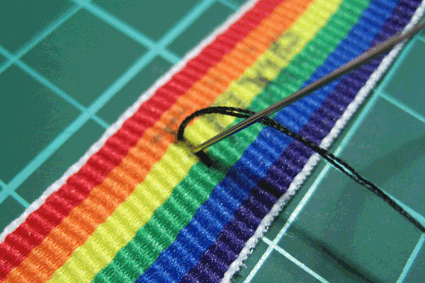
Now you need to start your embroidery. I used a simple backstitch with a doubled over piece of thread knotted at the end. For added security, at the end of each letter I tie a knot just in case the thread gets caught on something - saves me redoing the whole tag again!


After you have finished you need to trim the ends and melt them using your candle - this will stop the ribbon fraying. Just do it quickly and make sure your ribbon is made of polyester otherwise it will catch on fire! At this point you can either fold the edges over and pin the ribbon onto your collar or just leave the ends unfolded as I have done.


I sewed my ribbon to the collar using my sewing machine, but I have also done it by hand before, it just takes longer. I used black thread so it is easier for me to unpick later on if I need to.


Because Trixie is still a puppy this collar is far too big for her, but I didn't want to cut the webbing in case I want to sell it or use it on a bigger dog. So I made a couple of those elastic collar keepers I showed you previously for the cats collars.


Now it is ready for the poor little puppy to wear next weekend!

You can easily do the same thing for cat collars as well. It saves dogs and cats getting their tags caught and losing them all the time. 

Monday, 19 September 2011

Elastic Collar Keepers

I recently bought new cat collars but after putting them on the cats I noticed that they didn’t have a keeper on them. After they wore their new collars for a couple of days the ends started curling outwards which I wouldn’t consider to be very comfortable for them. 


All I did to fix it was get a little bit of elastic and sewed it into a loop to fit. It doesn’t create too much bulk and since it is elastic it is soft and can be easily removed. I used the elastic off their old collars to make keepers for Trixie’s harness since that didn’t have any keepers either – she is still a puppy and chews the ends if they aren’t held back.