Showing posts with label tutorial. Show all posts

Tuesday, 30 August 2022

Felt Baby Watch

 We have smart watches and noticed our daughter would hold out her arm the same way we do when we hear our watch notification! It is super cute so I made her a little felt watch and taught her to to look at her left arm instead of mirroring us.


This was just a quick, easy, one off project so I didn't take step by step photos but I'll explain the process and add a very simple printable template. 


(The band on this template is 6" long so if you want it larger just increase your print size.)

  1. Cut a band of felt to fit your child.
  2. Sew ribbon to the band if you want - melt the ends with a lighter to stop fraying
  3. Cut two circles of felt.
  4. Attach the two circles using french knots at each hour
  5. Embroider some watch hands if you like
  6. Stitch the circles to your band - I used white thread just under the purple layer so the stitches weren't visible on the front.
  7. Add a snap and your watch is ready to wear!
You could go even simpler and cut the felt band only and embroider directly on that, it just won't hide the stitches and knots.

My baby loved it and puts her arm out so she can wear it, but the felt just gets yucky pretty quick so I certainly won't be putting in too much time on this little project.

Tuesday, 29 March 2022

Ironing trolley

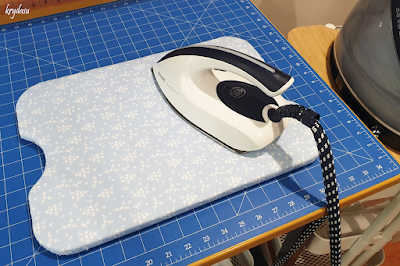
 I have one of those big steam irons that take up so much room on my ironing board and doesn't have a home so it is always in the way. But then it got placed on this Ikea trolley which has now become my permanent ironing station! 

It has this chopping board on top where I sit the iron and I bought a second one to create a mini ironing board, it is perfect for pressing all the seams when sewing.

All I did was trace the board then cut 1 layer of Insul-Brite and 4 layers of flannel to sit on top of the wood. For the outer layer I traced the board and added 1" all the way around using cotton fabric (mine is from Frankie Bear), then notch the curved edges. 


Line up all the fabric then place the board on top (upside down). I just used wood glue all around the edge and pulled the fabric taught and pressed it onto the glue until it held. Then leave to dry. 


The edges look a little rough on the curves so you could glue ribbon around the edge to finish it off. I'll get around to that one day!


Friday, 19 April 2013

No sew bird tent

My SIL just got a parrot and with winter coming up he needs a snuggly bird tent!

I know my SIL is worried about birds chewing fabric and rope and then getting it stuck in the crop, around their feet, etc. so I decided to make a no sew bird tent to avoid any sewing threads being chewed loose. As well as not sewing this bird tent I used polar fleece as it doesn't fray  - obviously this will still cause problems if the bird ingests bits of fabric so I'm hoping he doesn't enjoy chewing his new bed!


Since I was just figuring this out as I went along, all I can do is explain my process:
  1. Cut a base to 16cm x 11cm in order to support your bird - I used a takeaway container lid, just make sure it is plastic so your bird tent can be washable!
  2. Cut 2 rectangles from your polar fleece that are 22cm x 45cm. (this makes the sides 16cm x 14cm)
  3. Cut your notches 3cm into your fabric and space them 1cm apart. Do this for all four sides
  4. Next you need to secure your base between the inner and outer fleece layers directly in the middle. Snip some holes along each edge of your base and tie the layers together with your fleece strips. My strips were 1cm x 10cm and I used four of them for each side.
  5. Now the fun part begins - start tying the knots all around the outside edges...
  6. Lastly just poke some hanging holes through the tops with paper clips and your new bird tent is ready to hang!
I hope that makes sense for anyone who wants to make their own no sew bird tent!

Tuesday, 5 March 2013

Feather Cross Stitch Pattern

I have been wanting to add another cross stitch to my "coaster wall". I really should take an updated photo of it!

Quite awhile ago I started creating this feather cross stitch pattern which is finally ready to share with you. If you would like to see my other free patterns you can simply click the cross stitch tab at the top of my page or click here.


I chose to do this one in red to bring some more colour into our office. I'm considering doing a mirror image of this in blue for my wall as well.


I hope you enjoy my latest cross stitch pattern!

Sunday, 11 November 2012

Mounting Cross Stitch to MDF Coaster Tutorial

As promised, today I am showing you how I mounted my finished love birds cross stitch to the MDF coaster. 


I apologise in advance for my photos, I really need to get someone to take the photos for me rather than trying it myself - that or try out a video tutorial! 
What I use...

Nail file (or sandpaper) 
White paint 
Sponge brush (or paintbrush) 
Paintbrush for glue 
PVA glue 
Watered down PVA glue 
Scissors 
And most importantly your finished cross stitch piece 


1. Remove the sticker. They annoy me so I do it, but it isn't necessary. 

2. Sand down all the edges with your nail file or sandpaper. I know, it seems weird, but I always have a nail file in my pen holder as it is far more convenient for crafting. 


3. Using your sponge brush or paintbrush paint all the edges with white paint. I like to smooth the front and back where the paint pools so there are no bumps. For better coverage I do two coats. 

4. Paint the front of your coaster white. Since I used white AIDA I don't want the brown MDF background showing through the holes. 


5. I have done two coasters so you can see what the front and back look like. Allow this to dry thoroughly before moving on to the next step. 

6. Give the front a nice even coat of PVA. Remember it will soak into the AIDA and the floss a little. 


7. Carefully position your cross stitch on your coaster. Try to line up the rows with the sides of the coaster. Avoid pulling at the AIDA as it will stretch out of shape. In the case of the love birds I lined up the branch first to make sure the stitching goes right to the edge of the coaster. 

8. Once you are happy with the positioning you will need to press down on all sections of your cross stitch. Don't rub it, just keep pressing the AIDA down into the glue as it dries. Pay particular attention around your stitching as this is where the cloth lifts the most. 


9. Once your PVA has dried and your cross stitch piece is glued in place, flip it over and give the back two coats of watered down PVA. This step is optional - I use Blu-Tack to hang these on the wall and have found if it isn't sealed the Blu-Tack will pull away a little layer of the MDF each time I try to move it. 

10. Use your scissors to carefully trim the excess AIDA. I trim as close as I can, but you have to be careful not to cut into your coaster as you will ruin the painted edges. 


11. As you can see it is now nicely trimmed with no frayed edges and the glue is holding it well. 

12. This is a rather useless photo but it is an important step! You need to seal the edges so the AIDA and any cut stitches will not fray. Simply use your paintbrush to put a thick layer of PVA all around the edge - make sure you are getting both the AIDA and the coaster edge. Do two coats. 


13. Again this is another useless photo where I was trying to show that I have used the PVA on all the edges and to prevent those stitches I cut from coming loose. 

14. My piece is now ready to be added to my coaster wall

I hope this tutorial helps you get creative with your cross stitch displays. Let me know if you need any more help, or if anything doesn't make sense.

Tuesday, 6 November 2012

Love Birds Cross Stitch Pattern

I made a new cross stitch pattern to suit an mdf coaster so I can show you how I mount the completed cross stitch. 

This cross stitch features two love birds which are based off the wedding gift I made for my SIL and her husband. 

It looks quite cute on my wall and I have to say I quite enjoy these small, simple cross stitch patterns - mostly because they are quick to complete! 


As usual, you can simply right click the above image and save as or you can download the jpg through google docs

I hope you enjoy stitching up these two sweet little love birds! In the meantime, I have taken photos and will get that tutorial ready for you soon!

Thursday, 25 October 2012

Bamboo Cross Stitch Pattern

As promised last week I am sharing my bamboo cross stitch pattern today. 


I sized this pattern specifically for the MDF coaster I wanted to mount it on so you may need to extend the bamboo stitching a little. 

If you are interested I used the Boyle MDF coasters which I buy from Bunnings. 


I have posted it as a jpg so you can just right click and save as or download through google docs

Have fun stitching!

Thursday, 27 September 2012

Glitter gift tags!

I found photos I had taken for a tutorial quite awhile ago and had forgotten to post it! 

You may have noticed in my Flickr photos that I have made quite a few glitter gift tags and cards. They are really quite easy to do so I thought I would share how I do it. 


Materials:

A stencil (or you can freehand your image)
A skewer and/or toothpicks
Glitter
PVA glue
Blank card


1. Gather your supplies!
2. I chose to use a shell stencil for this gift tag so just line it up where you want the picture to be - think ahead of where you will be writing.
3. Because we are using glitter we don't want to see pen or pencil marks where we outline our image. Use your skewer just like a pen and create an indented outline in the card.
4. As you can see it is a little difficult to see the outlines but it looks much better when finished.
5. Using a skewer or toothpick start filling one section of your image with pva.
6. Once it starts to dry around the edges you will need to glitter that section and move onto the next.
7. You can carefully complete sections next to already glittered parts - it is better if you can do each section in one go.
8. Once you are finished leave the pile of glitter on top until you are sure it is dry.
9. Tap off the excess glitter and your glittered tag is ready!

Unfortunately my husband put something on top of mine while it was drying. All I was worried about was the cat jumping on it - I know better now. 

Go ahead and make your own cute gift tags using glitter!

Saturday, 7 July 2012

Covering a spiral notebook

I always have a pile of little notebooks sitting on my desk allocated to different things. I hate that they are yellow and that I have to look in them all until I find the right one!


I used to cover them in contact just up to the spiral section as well as folding the edges over - as if I was back in school covering my exercise books.


Now, I take the spiral off before covering the notebook which looks much nicer and covers all of the yellow!


If you are interested in covering spiral notebooks this way, here is how I did it...


1. Grab your ugly notebook (I used Spirax No. 560 - A good size to keep in my handbag, but it also fits in the back pocket of my jeans)
2. Flip the cardboard covers out of the way and using 2 bulldog clips, hold all the pages together near the spirals.
3. Take a close look at the ends of your spiral and you will notice that they are bent inwards to stop it twisting its way off the notebook.
4. Grab a pair of pliers and bend the wire on both ends so it continues on as a spiral shape.
5. Simply twist the wire out of the holes.
6. You now have everything separated as required. As you can see the back cover is plain white on the inside so I opted to simply flip it around rather than cover it with contact and cut out all those tiny holes.
7. Cut your contact slightly bigger than the notebook cover.
8. If you don't know how to cover books with contact, just remove the backing paper from one edge of the contact.
9. Flip the contact over and line it up with your notebook cover. Once you have the contact stuck to your table and the top of your notebook cover, just start pulling the backing paper off while rubbing the contact down with your fingers. Doing it slowly prevents air bubbles. Some people used credit cards or rulers but I don't like the way it marks the contact. If you don't want to use your fingers just use a cloth or sponge.
10. Using a craft knife, trim down the sides of the contact, using the edge of the cardboard as a guide.
11. Now you need to cut out all the little holes - hence why I opted to leave the back plain!
12. Hold your covers in place with your paper (still clipped) inside and twist the spiral back onto your notebook.
13 .Grab your pliers again and bend the coils back to their original positions, or twist it around as I have. 

Now you can remove the bulldog clips and use your customised notebook.

It is actually a quick project if you are used to using contact paper, even cutting out the little holes doesn't take too long.


You will find some contact (eg. the blue notebook I covered) is still rather see through, so you may want to test a scrap piece first. For the blue notebook I just used the back cover so the pattern would still show through - luckily there is no writing on the back!

Wednesday, 21 March 2012

Bee Cross Stitch Pattern

I have been a bit cross stitch obsessed lately. Of my first 20 days of crafting, 5 of those days have been the completion of cross stitch pieces.

Today marks another day of working on a cross stitch pattern for my crazy bee. I have made up a pattern sheet to share with you. It is just a basic pattern sheet as I know I ignore the instructions that come with cross stitch kits. All I need to know is what colours to use and how many strands!

This is the first time I have ever made a cross stitch pattern, so please forgive the blurry lines! If I can get the quality any better I will let you know, but for now I feel it is legible.


If you want to see photos from my "Create for 365 days" you can visit my Flickr account. Or even easier - watch the slideshow located at the top left of my blog!

I think this would be a great cross stitch pattern for kids just starting out with half stitches. There are only 3 colours and each side is almost a mirror copy (it easily can be if you want the eyes in the same spot).

Oh and don't tell anyone but I didn't have any white embroidery floss... so I used my sewing machine thread! I now know embroidery floss definitely looks better for cross stitch, but I wouldn't drive all the way to the craft store just to get white floss - it is hardly noticeable.

I am adding this to the label of tutorials to make it easier to find the pattern.


* Edited to add this image of the pattern so you can simply right click and save as...

Friday, 16 March 2012

Puzzle Magnet

When I was little I used to make puzzles using magnets and stickers. It is so easy to do, and a fun craft for kids to make and play with.

The easiest way is to use stickers, but you can just as easily make a magnet of your favourite picture using double sided tape or glue.

For this tutorial I have used a panda photo cut from a calendar. You could use photos, magazine pictures or even artwork you have drawn yourself.


The best thing is that you can use magnets that companies use for advertising. Yes, I do have a lot of these ready and waiting to be used for craft.


  1. Glue or stick your picture to your magnet and trim the magnet to fit your picture.
  2. Mark out your cutting lines for the pieces.
  3. Cut each piece carefully so they line up properly.
  4. Assemble either on your fridge or the back of another magnet.
Please excuse the bad quality photos, the weather has been terrible again and my lights don't help!

Tuesday, 6 March 2012

Origami stars and a vase

We got given a few vases as wedding gifts that are too big to use for cut flowers, but too small to safely keep on the floor - especially with cats.

So I found all my little origami lucky stars and put them in one vase. Unfortunately I didn't have many and it looked rather silly. So I started keeping a box of paper on the coffee table so I could fold paper stars while watching tv. I finally had a decent amount but just could not be bothered to make enough to fill the vase up completely - and I have absolutely no blue paper left!


Would you believe me if I told you that the vase on the left actually has less stars in it than the vase on the right?

Yep, that's right, I cheated and I wanted to share it with you. I mean you could do the same thing with a jar of buttons, beads, dice, gemstones, shells, and the list could go on and on and...

All you need is paper, tissues, toilet or paper towel rolls, scissors and sticky tape! Actually you could even omit the tissues and scissors.

Here is what I did:

  1. Gather your supplies.
  2. Sticky tape your toilet rolls together.
  3. Sticky tape paper around the 2 rolls.
  4. Use your tissues (easier to mould them flat than it is with paper) to cover the top and bottom holes.
  5. Make as many as you need to fill your vase.
  6. When you start filling your vase, just do one section at a time, making sure that your stars have hidden the toilet paper rolls. I actually compacted mine a little to make sure it all held in place and didn't settle later on.
And there you have it - a time saving illusion!

If you want, make a lid for your vase to stop it getting filled with dust.


I used a stiff piece of plastic from the carton of a salt and pepper grinder set. Just sit it on top of your vase, trace the edge with a permanent marker, cut it out and use Blu Tack to hold it in place. You can remove the permanent marker using metho.

It works great for fish bowls as well, just make sure you have a hole cut out for air. It also stops the cats drinking the fish bowl water!

Now I still have another glass vase to fill...

Thursday, 16 February 2012

Tutorial - Ladybug Magnets

After making my cute little bee magnets, I decided to make some lovely ladybug magnets for my fridge as well. The bees and ladybugs must have noticed as they have been taking care of my veggie garden for me!


Print your template through google docs here.

If you need more in depth instructions, please refer to my bee magnets tutorial.

Supplies:
  • Printed template
  • PVA glue (or your glue of choice)
  • Felt - Black and Red
  • Magnet (mine is 3.8cm x 2cm with an adhesive back)
  • Googly eyes
  • Cardboard
  • Scissors
  • Chalk (or fabric marking pen)
  • Hole Punch
  1. Cut out all of your template pieces, your cardboard backing and four black spots using a hole punch. You will also need a pair of googly eyes.
  2. Glue your cardboard backing to your body piece.
  3. Glue the stripe to the centre top of the body.
  4. Glue the head to body; lining it up against the stripe.
  5. Glue on your spots - I chose to do 4.
  6. Glue on your googly eyes (optional - waste time moving them into crazy positions)
  7. After your glue is dry you can stick your magnet on the back and pop it on the fridge!
And now I have a ladybug family to add to my bee family. 

You can make your ladybug much simpler by not doing a stripe or antennae - like my little ladybug.

* Edited to add this image of the template so you can simply right click and save as...

Tuesday, 31 January 2012

Tutorial - Bee Magnets

I have been playing around with my felt stash lately after remembering a cute little bee I used to draw in my school diary.

The result is my crazy eyed bee magnets!


They are really easy to make once everything has been cut out. If you have little kids you could cut all the pieces out for them, then they can just glue it together.  To make it even easier, you can print the template at a bigger size.

Print your template through google docs here.

Now lets get started with the tutorial:


1. First you need to gather your supplies:
·         Printed template
·         Fabric glue
·         Super Glue or PVA/Hot/Tacky Glue (I used super glue as it dries fast – however it does show through the felt)
·         Felt – Black, yellow and white (or any colour you like – who says a bee has to be yellow?)
·         Magnets (I bought mine on eBay – they came with sticky back, precut in big sheets – mine are 3.8cm x 2cm)
·         For the eyes – either a hole punch for the black felt or googly eyes
·         Cardboard
·         Scissors
·         Washable marking pen and chalk
2. Cut out you cardboard backing template piece. Tape it onto your piece of cardboard, making sure to tape down all the edges.
3. Now simply start cutting out your cardboard backing. By taping down the template you can easily follow the template lines. This is easier than trying to trace the image onto the cardboard. Best of all, the template can be used over and over – the tape just makes it stronger.


4. Cut out the body template. Trace onto your yellow felt, then cut it out.
5. Cut out the wing template. Trace onto your white felt, then cut it out. Repeat for the second wing.
6. Cut out your stripe template. Trace onto your black felt, then cut it out. Repeat for the second stripe.


7. Cut out the eye template. Trace onto your white felt, then cut it out. Repeat for the second eye.
8. If you are using felt eyes, use your hole punch to cut 2 circles out of black felt.
9. If you are using googly eyes, it is as easy as picking the size you want!


10. Lay out all of your pieces to make the glueing process easy. This way you won’t be searching for any of the pieces you have cut out.
·         You will notice the cardboard backing piece is smaller than all of your felt pieces. This is so it will not show around the edges of the felt.
11. Start by applying your super glue to the body section of the cardboard.
12. Place the body piece onto your glued area, ensuring it covers the cardboard edges.

13. Now glue your wings into place, ensuring they butt up to the body and cover the cardboard edges.
14. Apply your fabric glue to the stripes and stick them in place.
15. Apply your fabric glue to the white eye pieces and stick them in place.

16. If you are using felt eyes, use your fabric glue to stick them in place.
17. If you are using googly eyes, use your super glue to stick them in place.
18. After your glue has dried you can simply stick your magnet on the back and pop it on your fridge!


Try not to use excessive amounts of glue as it will soak into your felt and show at the front (see the red bee). I did use super glue on one complete bee; however I would not suggest using it between two pieces of felt. It does hold it in place, but pulls off very easily.

You can use 3D fabric paint to draw little mouths on your bees like on my red bee.

If you don’t have any felt just use iron-on interfacing on fabric in place of the felt. The interfacing will stop the fabric fraying and you can glue it all together just like the felt.

You could even use coloured cardstock or paper for wall decorations.

* Edited to add this image of the template so you can simply right click and save as...

Monday, 19 December 2011

Holly Collar Tutorial

Here is the tutorial to make your own felt holly collar for your pet, as modelled by Trixie!


  1. Cut a piece of the red felt long enough to fit around your dogs neck – remember to take into account the overlap for the Velcro – and 4cm wide (choose the width based on what you think will look best on your dog).
    Trixie’s neck is 33cm and my piece of Velcro is 3cm = 36cm long x 4cm wide piece of felt.
    Cut 1 piece of interfacing slightly smaller than your red piece of felt and iron on. 
    For your holly leaves, draw the design onto your interfacing then iron the interfacing to your green felt. This will make it easier to cut out your holly leaves
  2.  For this step I chose to sew along the long edges of the red felt and down the centre of my holly leaves. I didn’t sew down the centre of the holly leaves on the cats collars so take a look at their photos to see what you prefer.
  3.  Attach your Velcro to the collar – making sure you attach one end to the front on the collar and the other end to the back of the collar. I just used tacky glue but you could sew it if you prefer.
  4. Next you need to sew your holly leave onto the collar – you could glue this part as well if you prefer.
  5.  For this collar I used some 2cm baubles as I didn’t have enough of my big bells. Just sew a couple of loops of thread through the hanging holes of each bauble (or bell).
  6. All finished – a very cute and quick Christmas craft project!

Friday, 4 November 2011

Ribbon dog tag

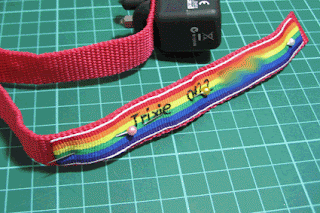
We had the need to buy Trixie a zappy collar after receiving a threatening letter about her barking! Not that she barks much because I have her inside - but better safe than sorry. I am home most of the time so she doesn't need to wear it very often, but we have a wedding to go to next weekend and she will be wearing her zappy collar. Because the collar I bought works through vibrations I can't have any tags hanging from her collar or have her wear her normal collar. I don't want to leave her alone without a name tag in case she escapes or gets let out, even though she is microchipped.


Enter Trixie's new ribbon tag...

What you will need:
  • A ribbon either the same width or smaller than your collar
  • A candle or lighter
  • Needle and thread (I used regular sewing machine thread but you can use embroidery thread)
  • Scissors
  • Marker
  • Lamp or lightbox
  • Sticky tape
  • Optional: Name and phone number printed off your computer
  • Optional: Sewing machine
I chose to print off Trixie's name and my mobile number only since I won't be home anyway. I did it in all different sizes then just cut out the size I chose. You can just write directly onto your ribbon if you prefer.

You will need to either write or trace your text onto the ribbon. I don't have a lightbox so I just used my lamp by taping the piece of paper onto the lamp. Now you will need to line up your ribbon and tape it down as well. I just used a texta to trace the text lightly onto the ribbon as a guide for my embroidery.


Now you need to start your embroidery. I used a simple backstitch with a doubled over piece of thread knotted at the end. For added security, at the end of each letter I tie a knot just in case the thread gets caught on something - saves me redoing the whole tag again!


After you have finished you need to trim the ends and melt them using your candle - this will stop the ribbon fraying. Just do it quickly and make sure your ribbon is made of polyester otherwise it will catch on fire! At this point you can either fold the edges over and pin the ribbon onto your collar or just leave the ends unfolded as I have done.


I sewed my ribbon to the collar using my sewing machine, but I have also done it by hand before, it just takes longer. I used black thread so it is easier for me to unpick later on if I need to.


Because Trixie is still a puppy this collar is far too big for her, but I didn't want to cut the webbing in case I want to sell it or use it on a bigger dog. So I made a couple of those elastic collar keepers I showed you previously for the cats collars.


Now it is ready for the poor little puppy to wear next weekend!

You can easily do the same thing for cat collars as well. It saves dogs and cats getting their tags caught and losing them all the time.