Showing posts with label home. Show all posts

Tuesday, 29 March 2022

Ironing trolley

 I have one of those big steam irons that take up so much room on my ironing board and doesn't have a home so it is always in the way. But then it got placed on this Ikea trolley which has now become my permanent ironing station! 

It has this chopping board on top where I sit the iron and I bought a second one to create a mini ironing board, it is perfect for pressing all the seams when sewing.
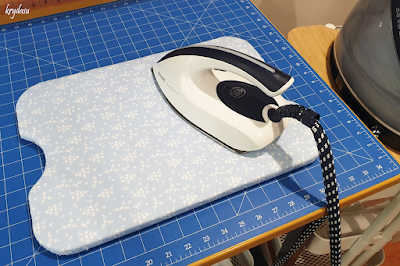
All I did was trace the board then cut 1 layer of Insul-Brite and 4 layers of flannel to sit on top of the wood. For the outer layer I traced the board and added 1" all the way around using cotton fabric (mine is from Frankie Bear), then notch the curved edges. 


Line up all the fabric then place the board on top (upside down). I just used wood glue all around the edge and pulled the fabric taught and pressed it onto the glue until it held. Then leave to dry. 


The edges look a little rough on the curves so you could glue ribbon around the edge to finish it off. I'll get around to that one day!


Tuesday, 16 June 2020

Terrarium

My sister in law made beautiful terrariums as Christmas gifts one year and I tried so hard (and then replanted it twice) but I just could not keep it alive. So I filled the jar with a layer of white gravel then a nice thick layer of black gravel. Then went to Ikea and bought cute little plastic succulents in pots. I broke them out of the pots and poked them down in the gravel, added the ornaments from the original terrarium plus some cute mini ones.


It looks alright, I much preferred the beautiful fittonia and fern - I just could not get them to survive, so fake succulents will have to do. It would be great if I could keep indoor plants alive - I'm working on it, my fish tank is turning into a plant stand and so far I've got a few survivors!

Tuesday, 9 June 2020

Air Conditioner Screen

We got a big air conditioner for the living area a couple of years ago and I've been wanting to make a cover for it as it is just so ugly! The thing that kicked me into gear was that I got sick of seeing the cage I put around all the pipes to stop the puppies chewing them, that and all their toys getting stuck underneath it.

Now I could have easily bought one, but where is the fun in that? I used hardwood garden stakes for the frame and fence palings to cover the sides, and smaller stakes to cover the top. I also made it bigger than I needed as it is a great place to put pot plants and trays of cuttings, safely out of reach of a certain puppy!


The other bonus of the air con screen is that it is just sitting there without needing to be attached to the house as there is a piece of garden stake sitting down behind the air con so it can't tip forward - this piece also had to sit between the air con unit and the pipes attached to the house wall.

Since I'm terrible at taking progress shots (and before shots) here is the model I made in SketchUp so you can see how simple it is. Oh and please ignore those beautiful mitered corners, as you can see when it came to all that wood cutting I took the lazy route!


Friday, 13 November 2015

Crochet Baby Blankets

Awhile ago I asked my mum to teach me how to crochet, while there are heaps of videos online that teach you how to do it, I just couldn't figure it out. So I started with a chevron blanket for our couch using three colours. Then for some reason I decided that I should make a blanket for my youngest nephews first birthday. I finished it just in time for his birthday party.


I really liked the yarn with different shades of blue, it made a cute blanket. I decided to use the same sort of yarn for my niece's first birthday present - this one was a very, very late birthday present!


I've decided that I don't like crochet, probably why it took me so long to finish that second baby blanket. Unfortunately I still have to finish the chevron one I started for our couch. Oh and I have another niece on the way so I'm trying to decide if I should do the same for her first birthday - if I do, then I need to make one for my 11 year old nephew... maybe I'll get one finished just in time for his 18th birthday!

Friday, 18 September 2015

More Cushions

I'm starting to think that cushions are my thing when it comes to sewing. Maybe because they are easy, the fiddliest part is the zip and it is put in right at the start so if you mess up it is easy to fix. Little dresses and such tend to need buttons and generally sewing the buttonholes is right near the end - if I messed that up the whole thing would be thrown in a drawer until I muster up the courage to try again!

So I will stick with cushions when I want a quick sewing project (or need room for more fabric). Plus since all my pets like sitting on cushions new ones are always a good thing at our house. The old ones get a second life as new indoor pet beds, then the old pet ones go outside for Trixie's kennel. 

Totally random story, but I have to share it; when Trixie was a puppy she used to drag her old bed around the yard until she found the perfect spot to have a nap - cushy beds are far more preferable to grass.


Now I have four new cushions for our couch, sized a little bigger than normal. Have you ever noticed that cushion inserts are quite expensive? Especially when you can generally buy two cheap pillows for $5. Granted, being cheap pillows means they don't have a lot of stuffing.

What I do is make a square cushion cover using the measurement for the shorter side of the pillow. Then just shake that pillow till the stuffing settles into a squared off shape and squish it into the cushion cover. Easy, and best of all cheaper than cushion inserts!

Friday, 4 September 2015

Woodburned Knife Block

Every time I go to Ikea, there are so many things I want to buy and by the time I get to the register I'm dreading the total. So I mentally take note of all the things I want so I can think about it for awhile before buying.

One of those items was their RETRÄTT Knife Block - an item I don't actually need since I already have a knife set with a block. Plus I wanted to burn a design on it and I wasn't sure if I could due to the lacquer.

Eventually I bought it of course, then it sat on my desk for ages because every design I tried to draw on it just wasn't right. Until I decided to get out my flower stencils and draw a few of those on. Then googled flower drawings and sketched a few of those in the gaps. So I started burning, drawing in more flowers, stems and leaves, then burning some more until I was happy.


Because of the lacquer, my pencil drawings rubbed off very quickly so I had no choice but to draw and burn flower by flower. Ordinarily I like my projects to be perfectly planned, but luckily this one turned out great and most importantly I enjoyed doing it.

Friday, 24 July 2015

Motherboard clock

My hubby likes building computers and because family and friends know that, he tends to be given their old computers. Generally, these computers are destined for landfill so I decided to use one of the old motherboards as the background of a clock for my hubby.

I started by using pliers to pull all the components off but it was taking forever so I used our multi tool to cut all the bits off. Then I cut the motherboard to fit a square shadowbox photo frame and drilled a hole in the centre so I could install the clock.

If I ever make another one it will probably be five times quicker and a lot easier than this first one!