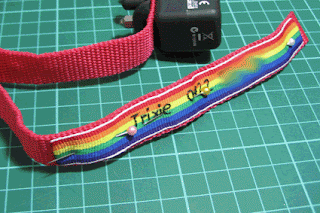
We had the need to buy
Trixie a zappy collar after receiving a threatening letter about her barking!
Not that she barks much because I have her inside - but better safe than sorry.
I am home most of the time so she doesn't need to wear it very often, but we
have a wedding to go to next weekend and she will be wearing her zappy collar.
Because the collar I bought works through vibrations I can't have any tags
hanging from her collar or have her wear her normal collar. I don't want to
leave her alone without a name tag in case she escapes or gets let out, even
though she is microchipped.
Enter Trixie's new
ribbon tag...
What you will need:
- A ribbon either the same width or smaller than your
collar
- A candle or lighter
- Needle and thread (I used regular sewing machine thread
but you can use embroidery thread)
- Scissors
- Marker
- Lamp or lightbox
- Sticky tape
- Optional: Name and phone number printed off your
computer
- Optional: Sewing machine
I chose to print off
Trixie's name and my mobile number only since I won't be home anyway. I did it
in all different sizes then just cut out the size I chose. You can just write directly
onto your ribbon if you prefer.
You will need to either
write or trace your text onto the ribbon. I don't have a lightbox so I just
used my lamp by taping the piece of paper onto the lamp. Now you will need to
line up your ribbon and tape it down as well. I just used a texta to trace the
text lightly onto the ribbon as a guide for my embroidery.
Now you need to start
your embroidery. I used a simple backstitch with a doubled over piece of
thread knotted at the end. For added security, at the end of each letter I tie
a knot just in case the thread gets caught on something - saves me redoing the
whole tag again!
After you have finished
you need to trim the ends and melt them using your candle - this will stop the
ribbon fraying. Just do it quickly and make sure your ribbon is made of
polyester otherwise it will catch on fire! At this point you can
either fold the edges over and pin the ribbon onto your collar or just leave
the ends unfolded as I have done.
I sewed my ribbon to the
collar using my sewing machine, but I have also done it by hand before, it just
takes longer. I used black thread so it is easier for me to unpick later on if
I need to.
Because Trixie is still
a puppy this collar is far too big for her, but I didn't want to cut the webbing
in case I want to sell it or use it on a bigger dog. So I made a couple of
those elastic collar keepers I showed you previously for the cats collars.
Now it is ready for the
poor little puppy to wear next weekend!
You can easily do the
same thing for cat collars as well. It saves dogs and cats getting their tags
caught and losing them all the time.


No comments:
Post a Comment