Thursday, 25 October 2012

Bamboo Cross Stitch Pattern

As promised last week I am sharing my bamboo cross stitch pattern today. 


I sized this pattern specifically for the MDF coaster I wanted to mount it on so you may need to extend the bamboo stitching a little. 

If you are interested I used the Boyle MDF coasters which I buy from Bunnings. 


I have posted it as a jpg so you can just right click and save as or download through google docs

Have fun stitching!

Sunday, 21 October 2012

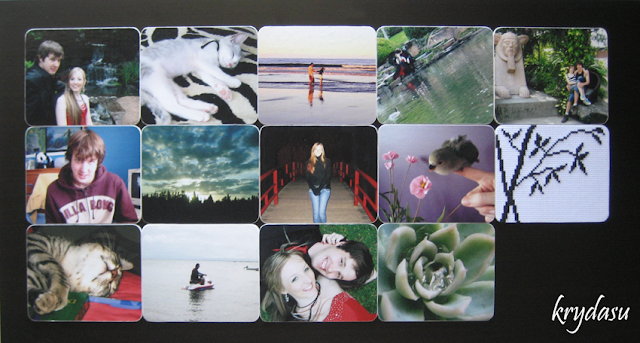
Coaster photo wall

Back in April I had what I hoped would be a brilliant idea and started working on this never ending project... 

The idea was to use little MDF coasters I found at Bunnings to create a photo wall! Obviously this project will take a long time but the idea is that once I have a wall full of them I can just change around or switch out old for new. At 69c each it is a cheap project and being MDF I can just Blu-Tack it to the wall without the worry of hearing photo frames crashing to the floor! 


As you can see it looks great when they are all laid out together - all I need to do is pick which wall I want to use and then decide what colour to paint the wall! 

I ended up getting the idea to add a cross stitched coaster to my wall, and luckily it seems to have worked the way I saw it in my head. I'll share that bamboo pattern with you in my next blog post. It is a little fiddly mounting it onto the MDF coaster but so far it is holding well - I'll get started on another cross stitch piece so I can share with you how I mounted it. The only thing I am worried about is whether the glue will cause the aida to yellow over time. 

I hope this gives you new ideas for displaying your favourite photos (or artwork)!

Tuesday, 16 October 2012

Patchwork sewing machine cover

I had quite a few scraps leftover from making cushion covers, and as small as they were I could not part with them! So I decided to have a go at patchwork and at the same time make a cover for my sewing machine (well, a cover for my sewing machine case which is boring and white). 

After all the time I spent cutting and sewing those little pieces of fabric together I was quite hesitant to cut out my pattern pieces and sew them for fear of making a mistake. 


As you can see I worked up the courage and I am quite happy with it. I chose to try out bias binding for the bottom but I definitely need more practise with that! The only thing I would change would be to use heavy interfacing. I bought a packet of medium interfacing which seems to be lighter than my other light/medium interfacing and it just isn't as stiff as I was hoping. 

Other than that, patchwork was great for practising cutting with my new Olfa rotary cutter and sewing heaps of straight lines!

Friday, 12 October 2012

Spring Flowers 2012

Even though it is freezing and windy in QLD today, the flowers are reminder that it is indeed spring! 

I thought I would share some photos of the beautiful flowers that have opened up and added some colour to my garden. 


I can't wait to pick the tomatoes off this beefsteak tomato plant, I also have a roma tomato plant that is still going strong since last year! 


I have no idea what this little shrub is, but I noticed it has these cute little flowers on them - I keep meaning to try and ID it. 


My cat mint looks great covered in purple flowers - this is the first time I have planted it in the garden and it looks far better than my previous attempts at growing it in a pot! 


Strawberry flowers - the best flowers since they are followed by delicious strawberries. 


A yellow calendula which has finally settled into the garden. 


This is an aloe vera flower spike - in front of the huge ponytail palm. Now that my front garden is looking good I have started on this mess of a garden bed - don't plant horrible vines in your garden that have huge seed pods! 


Some of my succulents are flowering and making a big mess. 


This bottlebrush is attracting rainbow lorikeets and little finches. 


My geisha girl is happily flowering and seems quite happy to be in the ground and out of its pot. 


I have recently moved my jasmine from a pot to the front yard. It must have settled in already as it has started flowering. 


I'm not positive but I think this plant is a jade which has these pretty little flower spikes. Unfortunately these form tiny succulent leaves which break off in the wind and start growing wherever they land. 


And I have saved the best for last - my beautiful hippeastrums. I recently divided up all the bulbs I had from my multiple pots so I could plant some into my front garden. This is my biggest bulb and I was quite surprised at how quickly it sent up a flower spike. It currently has four open flowers and another two buds waiting to open - last year it had a total of five flowers. At this stage none of my other bulbs have sent up a flower spike. 

I hope you are enjoying all the beautiful spring flowers!

Wednesday, 3 October 2012

Create for 365 days - August 2012

Well I have been a bit slack with photographing, editing and uploading the crafts I have been making! I've finished uploading the photos from August, however they aren't very interesting since I mostly did origami while we were away.

154: Blue rope dog toy. This is the tutorial I used to learn the 'braiding' - http://www.yellowdandy.com/2011/03/diy-dog-chewtug-toy.html
155: Stamped gift tags.
156: Another wall plaque.
157: Ladybug magnets.
158: Glass stone magnets. I used this tutorial - http://www.makoodle.com/diy-glass-magnets-easy-teacher-gift/
159: More origami balls.
160: Pendant made from a coconut shell elephant button.
161: Finally filled my origami ball vase!
162: Stamped bookmarks which I then coloured with gel ink pens.
164: Light purple loop hair clip - angled cut. Tutorial - http://www.craftinessisnotoptional.com/2011/11/rolled-felt-flowers.html
165: Origami cubes now that my origami ball jar is full!
167: Attempted a wire wrap pendant of a Matroyshka bead.
168: Lino cut shell stamp.
169: Butterfly cabochon pendant.
170: Created a lino cut love stamp... but then I lost my stamp!
171: Modified a cross stitch pattern from my "Two-hour cross stitch" book by Patrice Boerens.
173: My first attempt at a luggage tag - I am making these for father's day gifts.
174: Three more origami cubes.
175: Five more origami cubes.
176: My red cross stitch tree magnet.
177: Four origami cubes.
178: Three origami cubes.
179: Graphic of my love logo since I lost the stamp I carved.
180: More origami cubes.
181: And even more origami cubes.
182: Blue tree cross stitch magnet.
183: Used hot glue to keep my peg basket in place.
184: The luggage tags I made for my dad for father's day.

Unfortunately my Flickr account is getting close to the limit for a free account so I will be deleting a few of the photos - mostly repeats of projects like my origami cubes and balls.